You can always recreate your work if you have a copy of the Customizer settings you used to create a design and the associated openings_and_additions.txt file. You can generate and save a copy of your Customizer settings from within the keyguard designer.
Unfortunately, copying values from the Customizer settings back into the designer can be tedious and error-prone. It’s much more reliable and quick to deal directly with the Preset for that design. Remember that all your presets are stored in your keyguard_vXX.json file (the XX will depend on what version of the keyguard designer you’re using). By the way, you pronounce JSON as “jay’ son.”
With some work to set things up, you can quickly and easily export and import presets from and to your keyguard.json file.
Setting things up
Python
A couple of Python programs will export and import your Presets. Python is a computer programming language. Installing the Python language on your computer will be the first step in setting things up.
Go to Python.org’s download page and download the installer for your operating system. The pictures on this page represent installation on a Windows PC.
Click on the button to download the installer and then go to your downloads folder:
Double-click on the installation program and the installer will launch:
Be sure to check the two boxes at the bottom of the page:
And click on the “Install Now” option.
When the installation completes, you’ll see this window:
Go ahead and click on the “Disable path length limit” option. It can’t hurt…
Python export and import programs
Download this zip file, put it in your Keyguard Design folder., and expand the file. You’ll have a new folder called “Preset export and import.” You can now delete the zip file.
Open the new folder, and you’ll see two files:
Right-click on the export_Preset.py file and choose “Properties” from the pop-up menu:
Then select the entry “Python” and click the “Set default” button:
Add a text file to the folder and call it something like “preset export and import commands.txt” (the name isn’t critical):
Open that text file for editing and prepare to add a few lines.
The first line you add to the file will describe the path the computer will follow to get to your folder. Note the path description at the top of the window:
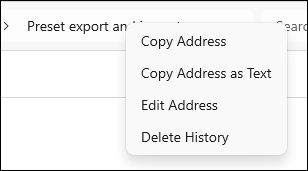
Right-click on the last entry (the name of the folder) and choose “Copy Address as Text”:
Now paste that value as the first row in the text file (this is what my path looks like):
Your path will look different from mine. That’s OK (and right)!
Next, position the cursor at the start of the line and type “cd “:
For the nerds, this command will tell your computer to “change directory” to the location of your Python Preset export and import programs.
Next, copy the two lines below and paste them into your file:
export_Preset.py "source JSON file" "Preset to export as a file"

import_Presets.py "Preset file to import" "target JSON file for import"
Your text file will now look like this:
The line that begins with “export_Preset.py” is the command that exports a preset from your keyguard_vXX.txt and puts it in a new file with a name based on the name of the selected Preset.
The line that begins with “import_Preset.py” is the command that takes all presets found in one file and merges them into the target file of Presets.
You’ll change the text that appears between the double quotes so that these commands will do what you want them to.
You’re all set up now.
Exporting a Preset
Preparing the export_Preset.py command
When you’re ready to export a preset from your keyguard_vXX.json file, begin by copying the file and pasting it into your Preset export and import folder:
Now launch the keyguard designer and look at the available list of Presets in the file:
Select and copy the name of the Preset that you want to export (in this example, we’ll export the Preset named “Accent 1400”:
You want to have the exact name of the Preset you want to export.
Now open the text file containing your three commands. We’re going to edit the second of the two commands:
export_Preset.py “source JSON file” “Preset to export as a file”
We’ll put the name of your keyguard designer JSON file between the first set of double quotes and the name of the Preset to export:
export_Preset.py “keyguard_v66” “Accent 1400“
(the bold is just an indication of how the command was updated)
This command will tell your computer to export the Preset called “Accent 1400” from the file keyguard_v66.json (located in the current folder) and put the information associated with that preset in a new file called “Accent 1400.json”.
Opening the Command Prompt window
You’ll be invoking the export_Preset program from a special program called the Command Prompt. To launch this program, find the Windows search box near the Start Menu:
Type cmd into the box, and you’ll see the Command Prompt program as an option for you to run:
Click on the Best Match entry, and a new window will appear (click on the image to enlarge it):
Look at the last line in the window. It ends in a”>”. That’s how the computer tells you that it’s waiting for you to provide a command for it to execute. The first thing you will do is command the computer to change to the directory where you have your Preset export/import commands.
Copy the first line from the Preset export and import commands text file and paste it after the “>” ( use the Ctrl-v keyboard shortcut to paste the command):
Next, press the Enter key on your keyboard. The last line of the window will change to the path to your new directory, followed by a “>”:
Copy the second line from your text file (the export_Preset line) and paste it after the “>”:
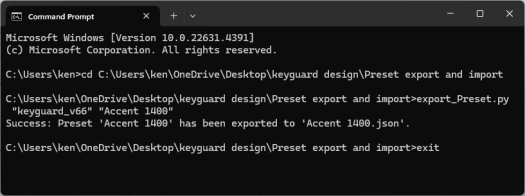
And, again, press the Enter key on your keyboard. Your computer will execute your command to export the Accent 1400 preset from the keyguard_v66.json file and create a new file called Accent 1400.json:
You can now close the Command Prompt program. You can just click on the “X” in the upper right of the window, or you can type “exit” after the “>” and press Enter:
Now look at your Preset export and import folder. You’ll see a new file there called “Accent 1400.json”:
You can copy this file to another folder associated with your Accent 1400 keyguard design or send it to another person doing keyguard design to show them your thoughts. Finally, you can put this file in the folder with the keyguard designer program, change its name to match that of the keyguard designer, and run the designer program. You’ll only see this one when you look at the list of available Presets. Of course, you’ll want to make a copy of your original keyguard_vXX.json file before you do this.
Importing one or more Presets
What if you want to consolidate several or all of your presets into one file? Maybe you want all your Accent presets in one JSON file and all your NovaChat presets in another – or perhaps you want to combine all the Presets associated with a particular AAC app into a single JSON file. You can do that by executing the import_Presets.py program.
Preparing the import_Presets.py command
The import command looks like this:
import_Presets.py “Preset file to import” “target JSON file for import”
You put the name of the JSON file containing the Preset or set of Presets that you want to import into the first position. The JSON file, which will receive the Preset or Presets from the first file, goes into the second position. In this example, we’ll import the Preset in the “Accent 1400.json” file into the “keyguard_v66.json” file. Only use the first part of the filename. Ignore the “.json” part of each name.
The final version of the import command will look like this:
import_Presets.py “Accent 1400” “keyguard_v66“
(the bold is just an indication of how the command was updated)
Begin by opening the Command Prompt window as before. Copy and paste the “change directory” command after the “>” character and press the Enter key, as before. You’ll now be located in your “Preset export and import directory” again.
Copy and paste your prepared import_Presets.py command after the “>” character:
You may remember that we exported this same Preset from the keyguard_v66.json file, earlier. The act of exporting a preset doesn’t remove it from the original file. So by initiating this command, you’re asking the computer to add the Accent 1400 Preset to a JSON file that already has a Preset with that name. The computer will ask you how you want to handle the situation:
It’s asking you to type an “O” if you want to overwrite the Preset with the same name in the keyguard_v66.json file with this preset or type “S” if you want to skip this preset and move to the next one (if there is a next one in the “Presets to import” file), or type an “R” if you’d like to import this Preset but give it a new name first. Note that you can type lowercase letters, too.
In this example, we type an “r,” and we’re asked to provide a new name:
We type “Accent 1400 a new copy”:
We could have typed any name that makes sense – and then press Enter. The import is successful:
The process continues for each remaining Preset in the import file. In this example, there is only one Preset in the file, so the process stops. You can now close the Command Prompt window.
Copy the keyguard_v66.json file back into the keyguard design folder.
If we now launch the keyguard designer and look at the list of available Presets, we’ll see that there’s a new Preset included at the end of the list, and it has the name that we gave it during the import process:
Playing it safe
Letting a program make changes to your primary JSON file may be a little scary. The file may contain many Presets and represent months of keyguard design work. If you’re concerned, you can have the import_Presets.py program make a backup copy of the target JSON file before it begins the import process. To do that, add a “-b” to the end of the command:
import_Presets.py “Accent 1400” “keyguard_v66” – b
If you do that, you’ll see an additional file appear in your “Preset export and import folder”:
As you can see, the backup file has the same name as the original file, with “.backup” attached to the end of the name.


