

If you’ll permit me to get on my soapbox, I’d like to share my experience and opinions regarding designing and making things, particularly assistive technology.
Here’s a bit about my background: I spent almost 30 years designing, developing, and supporting commercial products and the last 10 years designing, developing, and supporting do-it-yourself (DIY) assistive technology (AT) devices. I try to bring what I’ve learned in both environments to my work at Volksswitch.org.
I hope you don’t think I’ve performed a “bait and switch” on you with the title of this page. I could focus on how to find a design for a DIY AT device and then how to build it. I will address that topic indirectly, but here, I want to address a bigger, and I believe more important, topic – creating the designs themselves in a way that gets the device into as many hands as possible.
Still, no matter how confident I may sound, these are just my opinions. I believe I have a unique perspective on effective device design and development, but you can certainly find successful makers who will disagree with me – maybe you! We can talk – offline – about how you define success.
Contents of this Discussion
- What/Who is a Maker?
- What is DIY (Do it Yourself)?
- What is the Optimal Process for Making Assistive Technology?
- Assembling a Multi-functional Team
- Who can be a “Maker”?
- Commercial vs. DIY Solutions – Is a Solution Already Available?
- Who is the “customer”? Who will determine the “success” of your design?
- Design for 3D Printing- that you won’t be doing yourself
- Why I recommend Prusa Printers to techies…
- How to “Market” DIY AT?
- Where to Post your design? The answer is NOT GitHub.
- The GitHub User Interface
- Create a Web Page(s) for Your Design
- Instructables is a Reasonable Alternative –But Flat
- No Matter What List Your Design at Makers Making Change
- Why Makers Making Change?
- Funding and Longevity!
- A Contact Us Page and Feedback Forms
- Eliminating Barriers to Adoption
- How much can you charge for what you do?
- The Dark (Light) Side of 3D Printing
- Legal Liability
- Case Studies
What/Who is a Maker?
Since this topic is about Making, we should begin by defining a Maker…
It’s fair to assume that “Making” is something done by a Maker. But we should be more specific. Let’s start with the definition of a maker as provided by the Assistive Technology Industry Association in advertising for their “Maker Day” event in 2023.
“Who are makers? The maker community is comprised of people – high school STEM and robotics students, hobbyists, and DIY electronics enthusiasts – who are interested in using their skills to create and make solutions for people with disabilities. These are not always experts in AT, but they have a myriad of interests and just simply like to solve problems and make things.” – ATIA Maker Day 2023
High school tech students and electronics enthusiasts? This definition is WAY too narrow! My definition is very simple and much broader.
Who can be a “Maker”? Anyone who contributes to the design, implementation, support, and/or promotion of a DIY device or service.
I discuss the process for designing and implementing assistive technology and the necessity of assembling a “multi-functional” team below.
But what do Makers do? Rather than simply saying something vacuous like “they make things,” let me suggest that they focus on the design and implementation of DIY projects. I’ll restrict this further for the rest of this discussion by adding that these are assistive technology-related projects.
Next, let’s look at the “what” and the “why” of DIY.
What is DIY (Do it Yourself)?
“Designed for construction or use by amateurs without special training.” – Dictionary.com
This definition is misleading when it references “without special training.” It’s common for a DIY device to require some instruction/training. The device design team is responsible for providing this instruction/training. The “amateur” benefits by not needing the skills necessary to build the design at the start. For example, the maker may apply their computer-aided design skills so that the amateur implementer only needs to 3D-print the ready-to-print design.
Why emphasize “do it yourself” rather than “let me do that for you”?
Do it yourself:
- Allows the expert to get out of the critical path – The designer can focus on teaching and designing rather than being the limiting factor in the delivery of a device or service.
- Empowers others to work in parallel – Work is done in parallel, so more can be accomplished in the same amount of time.
- Builds skills – The implementers build skills that they can apply in other settings.
- Greater reach and greater impact – More makers means that more devices are getting into the hands of more people in more places – and they’re telling their friends.
Let me do that for you:
- Puts the maker in the critical path – The availability of the maker determines when, where, and how many devices will be implemented.
- Limits the opportunity for feedback – The maker is so busy implementing that there’s no time for listening to ideas that might improve the device.
When you embrace DIY, you acknowledge that you are no longer in control. You have less say over how something is built or used – but you receive the benefit of learning about the quality of your assembly instructions, and you get to see how your device can be modified and used creatively.
Let’s now examine the best way to make assistive technology. Allow me to impose my own criteria for judging whether a process is a “best practice.” A best practice gets the highest quality, least expensive, most effective assistive technology into the hands of the most people possible.
What is the Optimal Process for Making Assistive Technology?
First, an historical perspective…
The “Good Guy Gunslinger” Maker
Most AT designers begin with a specific individual and a specific need in mind, put blinders on during the design process, and move on after the device is delivered to that individual. I believe such a process is ineffective and almost disrespectful to those involved. It reminds me of an old Western movie called “Shane.”
In the movie, a good-guy gunslinger protects a family and town from a bad-guy gunslinger and then rides off into the sunset. It’s not clear that he has solved the long-term problem faced by the town, and he certainly hasn’t left the town with a phone number or email address for them to contact him if something comes up in the future.
Shane never does come back – not even in a sequel…
My first and most important recommendation would be: don’t act like Shane. Provide people with a way to contact you both before and after you interact with them. You’ll want to hear about their needs in depth in advance, and you’ll want to hear their feedback after trialing your device.
A corollary of this recommendation is that the maker should listen more than he/she speaks. If you have to talk, ask questions – in particular, ask questions that elicit feedback. The people you work with will be reluctant to ask you questions and make recommendations because of your presumed status as an expert. They’ll also be reluctant to give you the negative feedback you need to improve your work because they don’t want to make you defensive or alienate you. They will need you to support your work going forward.
An effective maker must be humble and willing to listen to others! A maker with an ego shuts down communication and increases the probability that their design will never be used.
If you watch the entire movie, you’ll never see Shane ask the townspeople what they need or what they think about his plans. Don’t be like Shane!
Oddly enough, the “Good Guy Gunslinger” is probably the most prevalent DIY, assistive technology development process. In truth, DIY isn’t happening in such a case. From the maker’s point of view, it’s more like, “Let me do that for you.”
Next, let’s take a step back (upward?) and look at the development process in general.
The Classic Design and Implementation Process
This diagram shows the design and implementation process (at a high level ) followed by most development organizations (click on the image to enlarge it):

The first step is the creation of a statement of needs. This statement of needs, or device requirements, must be of high quality. It’s important that the statement of needs includes requirements for the entire device lifecycle. How will the device be maintained? How will the user obtain spare parts or upgrade the device?
In business, one also determines how the new product or service is likely to perform against its competitors.
This is just part of the process of bringing products to market. Other pieces include marketing/sales, documentation, training, and support. The entire package is sometimes referred to as “the solution.”
Now, here’s the process followed by the traditional “master” maker.
AT Making Scenario 1: “The One-Off”

The “One-Off” process begins by focusing on the needs of a particular therapist or, more often, a particular disabled individual. It doesn’t make much sense to document this solution/device because of its one-off nature. Without documentation and without access to the designer, these devices are typically lost to history or end up on a shelf in a closet – and lost to history.
The story sounds very much like the “Shane” movie. It’s difficult to provide feedback to the maker because, well, they’re an “expert,” implying that the feedback is likely to be of little value. Many times, the maker has already moved on to their next challenge (or Western town).
By the way, this is the typical process adopted by college projects and weekend Makeathons. College students often attempt to address the needs of a particular individual in a single semester. At the end of the semester, they move on and never look back. Similarly, Makeathons pair a disabled individual with a few “technical-types.” They quickly brainstorm a solution and, at best, assemble a prototype. Such “solutions” barely survive the prototype-testing step, if that.
Devices that result from the one-off process are specific to an individual and, in the best case, address the needs of one out of 60 million individuals. It’s much better to look for commonalities and ways to meet the needs of multiple individuals with one solution.
Note that the maker is in the implementation critical path. No device will be delivered, now and in the future, without this maker (or team of makers) to make it.
AT Making Scenario 2: “Into the Ether”

Many device designs are simply posted on a site. Thingiverse is full of these devices. They are posted in STL format, which severely limits customization.
- There is very little, if any, documentation, and there’s no expectation of support.
- The device may never have been tested for its effectiveness.
- Depending on where it’s posted, it may never be seen or used by anyone.
- No device is delivered until someone stumbles across it. In any case, you’re completely on your own, and you get what you get.
AT Making Scenario 3: “Designed for X, Intended for Many”
Design for “X” is a shorthand for saying Design for Assembly, Design for Maintenance, Design for Customization, etc. By considering customization and personalization during the design process, you increase the probability that your device will meet the needs (and desires) of many individuals.
I’m going to make the case for the following process as the “best” process for the design and implementation of assistive technology. The process looks like this:

- This process is intended to be followed by therapists, caregivers, disabled individuals, and others who may not be considered to be traditional makers.
- By teaming with several therapists and several disabled individuals (normally accessed via the therapists), a variety of needs will be identified early in the process, and the result will be a solution that is applicable to many users.
- Including therapists with significant domain knowledge helps ensure that you won’t waste time designing and implementing a device that is already available commercially.
- In order to get assistive technology into the hands of as many people as possible, the device must be designed for non-makers (or at least for people who don’t naturally consider themselves to be makers) to build the final device.
- Documentation, training, support, and promotion of the device must be included in the deliverable developed by the team.
- Every individual who implements your design becomes a new evangelist, increasing the probability that others will learn about the design/device.
Why will this process result in successful design and implementation?
This process will produce successful results because it will include several key elements:
- It includes the creation of a diverse/multi-functional team early in the process.
- It considers the entire device (product) life cycle—are you accounting for all the stages in the device’s life cycle, and do you have representatives on the team for each stage?
- The proposed device will reflect the characteristics of a good (3D-printed) DIY AT candidate.
- The device will demonstrate all of the “abilities” in “Design for ‘X’”: customizability, personalizability, assembly, maintainability, supportability, and modularity.
- When possible, off-the-shelf components will be utilized to reduce upfront cost, development time, and lifecycle costs and leverage new technology more quickly. Anything that can’t be purchased off-the-shelf will either be difficult to obtain or put some Maker in the critical path.
I’ll expand on several of these items next.
Assembling a Multi-functional Team

Why do you need a team, and why should the members of the team have different but relevant skills, knowledge, and responsibilities?
- By assembling a team, you make explicit that your knowledge and abilities are limited. Be humble and listen. Your effort will be rewarded
- You increase the probability that the device or service will be high quality – all dimensions of quality. Neither you nor your team wants to produce something of low quality. Each team member will bring a unique and important skill and point of view to the process. Each team member will have insight into the broad range of needs to be fulfilled.
- You increase the variety of people who know about your device or service. Getting the word out is an important job of the team. Each team member will be positioned to evangelize about the device – potentially to very different audiences.
- You increase the number of individuals who will trial and benefit from your device or service. The more the word spreads, the more people will benefit from your work and provide feedback to improve the quality and further increase the spread.
Who can be a “Maker” and a member of the team?
By definition, a maker is anyone who contributes to the design and implementation of a device and/or service.
Who are these people?
- Needs Identification: disabled individuals, caregivers, therapists, teachers, ATPs.
- Market Research: Goggler’s, needs identifiers with contacts in the disabled community and mailing lists.
- Device/Service Design: needs identifiers, technical people, graphics designers/artists, and regular people who can think like consumers.
- Project Activities: project planners, project managers, facilitators, and progress monitors.
- Documentation & Training Development: “English Majors,” videographers, writers.
- Testing: needs identifiers, observant types who appreciate consistency, and anyone who can represent the skill level of the target implementers.
- Marketing: team members with contacts and team members who can do presentations.
- Support: all team members – especially those who participated in the development of the device/service, documentation, and training.
The challenge will be – how to recruit and involve all these people. Traditionally, this would be the responsibility of the Product Manager, but as the team begins to grow, the team members can all take on responsibility for recruitment.
Commercial vs. DIY Solutions – Is a Solution Already Available?

Next, let’s focus on the critical and often ignored “availability gate.”
- Check whether a solution is already available commercially. (It would be great if there were a way to make this simple.) Is a reasonable solution already available commercially? If you’ve assembled a diverse team, a member of the team may know.
- Ask before you design from scratch – take advantage of mailing lists and mailing list archives. Turn to mailing lists and Facebook groups for information about and recommendations regarding commercial products. In the US, the QIAT mailing list is particularly useful. As an AT maker, you should already be a member of this list. (see below for a registration link.) Another option is to search the archives of the QIAT mailing list for responses to postings regarding similar needs.
- Know what your device will offer above and beyond the commercial version – did you even know that there was a commercial version? Do you know how slim the margins are for vendors in this space? What would your solution offer above and beyond a commercial device? These vendors are devoted to a tiny market. Knowing that their profits will be small, they’re willing to serve the people who make up that market. Before proceeding, ensure your device will offer more functionality, customizability, reliability, personalization, and/or significant cost savings.
- Commercial companies support and are responsible for their devices. Will you be? Will you be there to support your device? Are you willing to accept liability if your device fails and someone gets hurt?
The “Disability Tax” Myth
- This is nothing like the “Pink Tax” – which is real. Companies often sell what is fundamentally the same product to both men and women but with different packaging and then charge more for the “feminine” version.
- Vendors in this space are not out to “gouge” individuals with disabilities. They are devoted to a tiny market and dedicated to serving the people who make up that market.
- These vendors aren’t “raking in the money.” This is a tiny market with wildly varying needs and no sweet spot. Do you know how slim the margins are for vendors in this space? And they still have to meet their monthly payroll.
- The fact that you can imagine being able to make a similar thing more cheaply has no bearing on the actual costs of designing, implementing, advertising, supporting, and insuring that thing.
Who is the “customer”? Who will determine the “success” of your design?
- The answer to this question may be different from “Who is the end user?” Ask yourself who will facilitate getting your device into the hands of as many “end users” as possible. Who can stand in as a proxy for the end user when gathering needs?
- Design for your customer, the end user, and critical stakeholders – especially if you need this customer to implement your device.
- Who is a critical stakeholder…
- Who can help define your device/service?
- Who do you want to build your device/service?
- Who will give you feedback about the effectiveness of your design/service?
- Once you’ve identified your customers, if you also expect them to be makers, know what “making” skills they have.
Who’s got the most leverage for success…?
In the business world, this is a critical question. In business, they sometimes substitute the word “stakeholder” to ensure that they’re considering the desires of everyone who can impact the success of the venture – and they use the words “critical stakeholders” for the key individuals.
These questions may help identify the key individual(s):
- Who will the device or service first be delivered to?
- Who will build your device? The needs of this individual or team must be considered during the design process. If someone else will be building your design, what skills do they have?
- Who has the most knowledge and reach?
- A for-profit business would also ask, “Who holds the purse?”. But you can ignore this question since you’re not in this for the profit. More on that below.
Where is the best point of leverage for DIY assistive technology devices?
The answer may be in the numbers…
- How many disabled individuals are in the US (per CDC)?
- 60,000,000
- How many AT Makers are in the US (per Makers Making Change)?
- 6,000 (10,000 disabled individuals per maker)
- How many therapists in the US – OTs, PTs, SLPs (per Bureau of Labor Statistics)?
- 600,000 (100 disabled individuals per therapist)
Therapists are responsible for knowing about available assistive technology. Therapists have access to disabled individuals and knowledge of their needs. Therapists have the most feasible “span of control”. OTs and PTs once had a reputation for designing and implementing AT for their clients. Empowered therapists will support (and empower) other therapists.
Therapists are the optimal point of leverage for DIY assistive technology!
How do we leverage the force multiplication capabilities of therapists?
- How do you recruit therapists to your team?
- QIAT mailing list
- AAC for the SLP
- Maker’s Making Change forum – the MMC forum is a good place to find people with technical skills who can help you with your design and implementation. MMC could do more to recruit therapists.
- Communication Matters (UK) mailing list
- How do you design so that therapists can implement your device/service? Start by involving them in the process.
- You must understand the maker skill set common to therapists. Design within those constraints. Each new skill you require these people to learn (on their own time) reduces the likelihood that they will support your vision.
- You must understand the time and financial resources of therapists. Most therapists are paid based on the time they spend with clients. They can’t afford to devote additional, normally unpaid, time and energy to an effort that doesn’t resonate with them.
- You must understand the equipment available to therapists. What’s the likelihood that a therapist will have a soldering iron and stand, a roll of solder, and a set of soldering helping hands in a drawer somewhere? Zero. So, what is the likelihood that your design will be implemented by a therapist if it requires soldering?
Design for 3D Printing- that you won’t be doing yourself
If you agree that you can’t be in the critical path – and your design requires 3D-printed parts – there are several realities that you need to internalize.
- Be able to give up control. If you want to get your designs into the hands of as many people as possible, you have to give up control of the build process.
- Ensure that your STL/design is foolproof. Your control ends at the STL file, but you can work to make your STL file or your design as foolproof as possible.
- Don’t make assumptions about your builder. Someone you don’t know will take your design and try to turn it into a device. You don’t know what hardware they have or what their skills are.
- Instead, assume they have the least capable hardware and only basic skills.
DON’T ASSUME that they know about the anisomorphic nature of 3D prints or how to rotate a model in their slicer. Orient your STL so that the element of your design that must be the strongest on the x-y plane.
DON’T ASSUME that they know anything about supports. Modify your design so that it doesn’t need supports. Don’t assume that they know how to turn on supports in their slicer, so modify your design so that it doesn’t need supports.
DON’T ASSUME that they have a large printer. Make it possible to section your design and then assemble the parts after printing. Break your design down into parts that can be successfully printed on a moderately sized printer (250 mm on a side or smaller). Plan for and provide features that aid in the assembly process, like mounting holes and alignment keys.
DON’T ASSUME that they have the hardware or skills to print “exotic” materials (e.g., nylon, ASA, ABS). Ensure your design can be printed in PLA and maybe TPU. Stick to designs that can be implemented in PLA and TPU (if necessary).
DON’T ASSUME that they can solder or do wire stripping. Stick to simple skills like screwing and gluing. Contrary to popular opinion (among technical folks), soldering and wire stripping are skills. They require special equipment, special training, and (for soldering anyway) can be dangerous. Keep the assembly simple. Many wires can be cut with scissors or knives and then joined with crimp-on connectors.
If parts must fit snuggly, add the ability to make small size changes to your design. If the parts of your design must fit snuggly together, include the ability to make small changes to your model’s dimensions. Relying on the customer to make size changes via their slicer software is unreasonable and often will create other problems.
Ensure that all non-3D-printed parts of your assembly can be purchased off the shelf (at Amazon, if possible). Make it as easy as possible to purchase parts. That will make obtaining spare parts easy as well. Your list of materials should include hyperlinks to where those materials can be purchased. Free Amazon Prime shipping can help a lot with the final cost of the device.
PLA – say it with me – PLA!
One filament type is easier to print with and comes in a rainbow of colors. It’s also likely to meet the functional characteristics of DIY assistive technology. What’s that filament type? Polylactic Acid (aka PLA). If you want your implementers to be successful and you want them to produce devices that delight the end user because they can come in exciting and personal colors, then PLA should be your first, second, and third choice.
- You can do magic, but your customer can’t. Yes, I know that you can print with blades of grass, feeding them slowly and carefully into the extruder, one at a time – but your customer can’t!
- Exotic filaments should be the customer’s choice, not a requirement. Let the customer experiment with more exotic filaments if they want – but let that be their decision. By the way, I consider PETG exotic because it can damage your PEI print surface if you don’t use something like a glue stick to help with separation when the print finishes. It also can result in lots of stringing if the retraction settings aren’t just right in the slicer. TPU has many of the same issues, but it’s the best choice if a device or part needs to be flexible and/or indestructible.
- Some PLAs require special nozzles. That makes them exotic. Wood-filled PLA and other PLA composites are exotic filaments because they can require special nozzles or produce clogs.
- TPU is an option, but know that you’re probably requiring your customer to have a direct-drive extruder. If a device needs to be flexible or indestructible, TPU is a reasonable choice, but be clear that this will very probably require that their printer have a direct drive extruder (no Bowden tubes allowed), and their slicer software should have a preset for TPU.
- There are more colors of PLA than all other filament types – combined! AT devices should be fun and personal. PLA provides all the color choices a person could desire and will reduce the likelihood of device abandonment.
Choosing a CAD tool for your designs
You absolutely CAN create your own designs. You don’t need to be limited by the designs that others have already created. There are software programs that make this possible – and many are free.
There are many of these programs, but I’ll focus on just three. I’ll characterize them by how difficult they are to learn, how complex an object they can create, and whether the designs they create can easily be customized by someone else.
Most CAD programs create designs visually. Sometimes, you assemble your design from simple, 3-dimensional shapes like in Tinkercad. In other cases, you draw a 2-dimensional shape and then “extrude” that shape into the third dimension, as in Fusion 360 and most other professional CAD programs. In special cases, I only know of one such tool, you create your design using a programming language. That’s OpenSCAD.
-
- Tinkercad – good for designing something simple that will need to work for everyone – as is. Tinkercad is the simplest tool to learn and use. Your design will be hard for others to customize, so it has to be something generic. Tinkercad can be useful for modifying STL files where you don’t have access to the original design. It’s easy to learn and is often the CAD tool of choice in middle schools.
- Fusion 360 – great for designing something very complex that will need to work for everyone – as is. Fusion 360 is sold to professional designers, but you can get a copy for free for non-commercial use. It will be impossible for others to customize your design. It’s designed for professionals so expect to encounter a challenging learning curve.
- OpenSCAD – perfect for designing something moderately complex that can easily be customized. This is the only CAD program that allows the general public to customize your design easily. If you’ve never encountered a programming language before, you’ll have to learn to think logically. Even if you’ve programmed before, it can be a challenge to think in terms of shapes in 3D-space.
Below is a screenshot of the OpenSCAD user interface.

The pane at the right of the OpenSCAD window is the Customizer pane. As its name implies. The individual who creates their design using OpenSCAD can use this pane to expose options that can be used by someone else to modify the design.
OpenSCAD
When you create a device design using OpenSCAD, you describe your design using a programming language. It’s a language specific to describing 2 and 3-dimensional objects.
Designing in “code” – an example:
The following lines of programming code define a variable named “height” and set its value to 10. Next it creates a “cube” that is 5 by 10 by “10”, and it puts this cube in the center of the x/y/z design space. Finally, it translates (i.e., moves) the cube 5 mm in the “x” direction and -5 mm in the “z” direction before it rotates the cube 45 degrees around the “y” axis.
height=10;

cube([5, 10, height], center=true);

translate([5, 0, -5])

rotate([0, 45, 0])
That’s all to say that it creates the following object with the following orientation in the following location:

Because “height” is defined as a variable, its value can be displayed in the Customizer pane and modified there – as its name implies. I’ve changed the height in the image below from 10 mm to 20 mm.

That change causes the displayed cube to instantly update to a new height value but retain its orientation and translation:

In real designs, the code is more complex, resulting in more complex objects. Because key variables associated with the design can be exposed in the Customizer and available for modification by anyone, it’s easy for anyone to modify the design to meet their individual needs and preferences.
The image below is of the Customizer pane for the Volksswitch keyguard designer. Each row is expandable to expose a collection of parameters that can be individually set to define a custom keyguard without requiring any CAD skills.

Here are some of the other features that make OpenSCAD perfect for designing assistive technology that someone else will customize, personalize, and build:
- You can save your Customizer settings as a Preset, which you can load at a later date if you want to print your device again or modify your original design.
- You have typical coding concepts like “variables,” and you have access to other commands that are specific to creating and manipulating 3D shapes.
- You can generate:
- STL, 3MF files for 3D-printing
- DXF, SVG files for laser-cutting
- PNG files for documentation
Most of the devices on the Volksswitch.org website have been designed using OpenSCAD and can include rich customization.
Why I recommend Prusa Printers to non-technical types…
Because I believe so strongly in the promise of 3D printing for the creation of custom assistive technology devices, I’m often asked by non-technical people which 3D printer I recommend that they purchase and use. I confidently tell them that they can’t go wrong with a Prusa printer. Why?
- Prusa printers just work and continue to work – you don’t have to start by fixing, tweaking, or upgrading the printer. You don’t need to do anything special to get it working and keep it working. You don’t need to babysit this printer
- If you run into a problem or just need help, Prusa provides 24/7 live support – in English! I think this is the most important feature when choosing among printers.
- Prusa regularly upgrades its software. They constantly enhance their free software and make it easy for you to upgrade your machine and slicer. I have an Artillery Sidewinder printer that still has the same firmware it came with several years ago because the manufacturer doesn’t release new versions.
- They have the best slicer software. The Prusa Slicer is the easiest to use, most fully-featured slicer software available – and you can get it for free. You can use it with non-Prusa printers, but it’s very good at leveraging the special capabilities of the Prusa line of printers.
- They have great features that hold your hand during the printing process. The firmware that runs on the printer holds your hand through actions like swapping filament and pausing the print to insert nuts.
- You don’t need a “fast” printer. Contrary to what you may see on YouTube, you don’t need a fast printer. Yes, it can take several hours to print a device, but it will take several days or weeks to purchase that device commercially and have it delivered – so what’s a few hours by comparison?
- You don’t need to save $600 on the cost of the printer. You can get a super cheap 3D printer and save $600. However, you’ll spend more than that in downtime and stress as you try to figure out why your prints are failing or as you try to overcome the language barrier in communication with support teams in China.
- You don’t need to save $200 on the cost of the printer. You can get a decent printer and save $200, but when you run into problems, you’ll find that you can’t easily fix them because the printer wasn’t designed to be repaired by the customer. (Talking to you Bambu Lab!)
- You don’t need an enclosure because you’re not going to be printing with exotic filaments. You don’t need to print nylon, ABS, or polycarbonate. And if you did, you’d still struggle to print with these filaments no matter what printer you purchased.
- (This one’s specific to schools.) You don’t need an expensive support and training contract. Prusa stands behind their printers and will help you address any problems you encounter. Those five “training seats” that you get as part of that $10K printer purchase will go to people who probably won’t be working for your school district two years from now because the turnover in public schools is so high. You’ll also find that many of these vendors sell “closed” systems. That means that you have to use the vendor’s supplied filament and their slicer which produces proprietary instructions for the printer. The filament, in particular, can cost 2 to 3 times what an off-the-shelf brand would cost. By the way, the printers that are part of that package probably represent technology that’s several years out of date.
Note that my advice is similar for “technical types” who are designing devices to be 3D-printed:
- You want to focus on designing and making AT, not upgrading your printer.
- Why not use the printer that your customer will be using? They also don’t want a printer that they need to fix, tweak, or upgrade.
- You will be designing (and/or building designs) for “non-techies” – so use the kind of printer that they will be using. That will discourage you from using and recommending filaments that require enclosures or hardened nozzles.
- You don’t need a “fast” printer.
- When iterating on a design, you won’t be printing the entire device, just the parts that are of interest at the moment—even just part of the part.
- Prusa Slicer will help you isolate just that part of the print that you’re testing.
- With OpenSCAD, you can “comment out” the lines of code that aren’t relevant to your test and that you don’t need to print.
- Note: Prusa printers are very accurate, but you’ll need to account for inaccurate printers in your design. You can’t assume that your customer has an accurate printer.
Taking measurements directly from your STL/3MF model
Prusa Slicer is more than a slicer; it’s a great design tool…
You may not even have to print your design to understand how well the parts will fit. Prusa Slicer has a great feature that supports you in measuring distances between points and surfaces in your design.
The image below was taken of a pressure switch design. I needed to get an accurate measurement of a channel through which a wire would be slid. Fortunately, I could get Prusa Slicer to measure that for me. There’s no need to print the piece in order to determine if this space is going to be too small.

The Litmus Test
Here’s the bottom line… Imagine that you’ve been contacted by a non-techie in another state. They want you to recommend a 3D Printer that they can purchase and use to make assistive technology.
You know that when they run into a problem, their first instinct will be to call you for help.
What printer/brand will you recommend?
How to “Market” DIY AT?
If you want your design to reach as many people as possible, you need to ensure that people know about it. So, how do you do this?
- Websites – Post your design on websites that feature 3D-printed AT or feature 3D-printed designs in general.
- Conferences – Make presentations, along with your teammates, at AT conferences and AT/Maker virtual meetings. Describe the benefits and effectiveness of your design.
- Word of mouth – If someone asks you how they can pay you for your work – especially someone who has implemented one of your devices, tell them to simply help spread the word. There’s nothing like a satisfied customer to convince people that they know that you’ve created something special – and they can make one for themselves.
- Finding and developing “evangelists” – When you find someone who’s especially excited about your work, ensure that they have everything they need to spread the word to all of their friends and associates. That may include additional and ongoing training or presentation materials.
- Etsy storefronts – don’t discourage sales – If someone would like to print and sell your design on a service like Etsy, ask them to keep the price “reasonable” and then give them the go-ahead. Remember that your goal is, fundamentally, to get your design into people’s hands where it can make a difference in their lives. If you decide that YOU want to sell your designs, then ask yourself if ANYONE ELSE has participated in the design and whether they should share in your profits. Also, be ready to give up the “Maker” moniker.
Where to Post the details of your design? The answer is NOT GitHub.
Your design is more than an STL file. Putting any part of it on GitHub relegates it to the ether.
The page below will probably be as far as anyone will go to pursue this maker’s design.

What’s wrong with GitHub? Read on.
The GitHub User Interface
Here’s a glimpse at the GitHub user interface. It’s intentionally designed for software development teams to manage their work.
These screens are confusing gibberish to anyone other than a software developer:
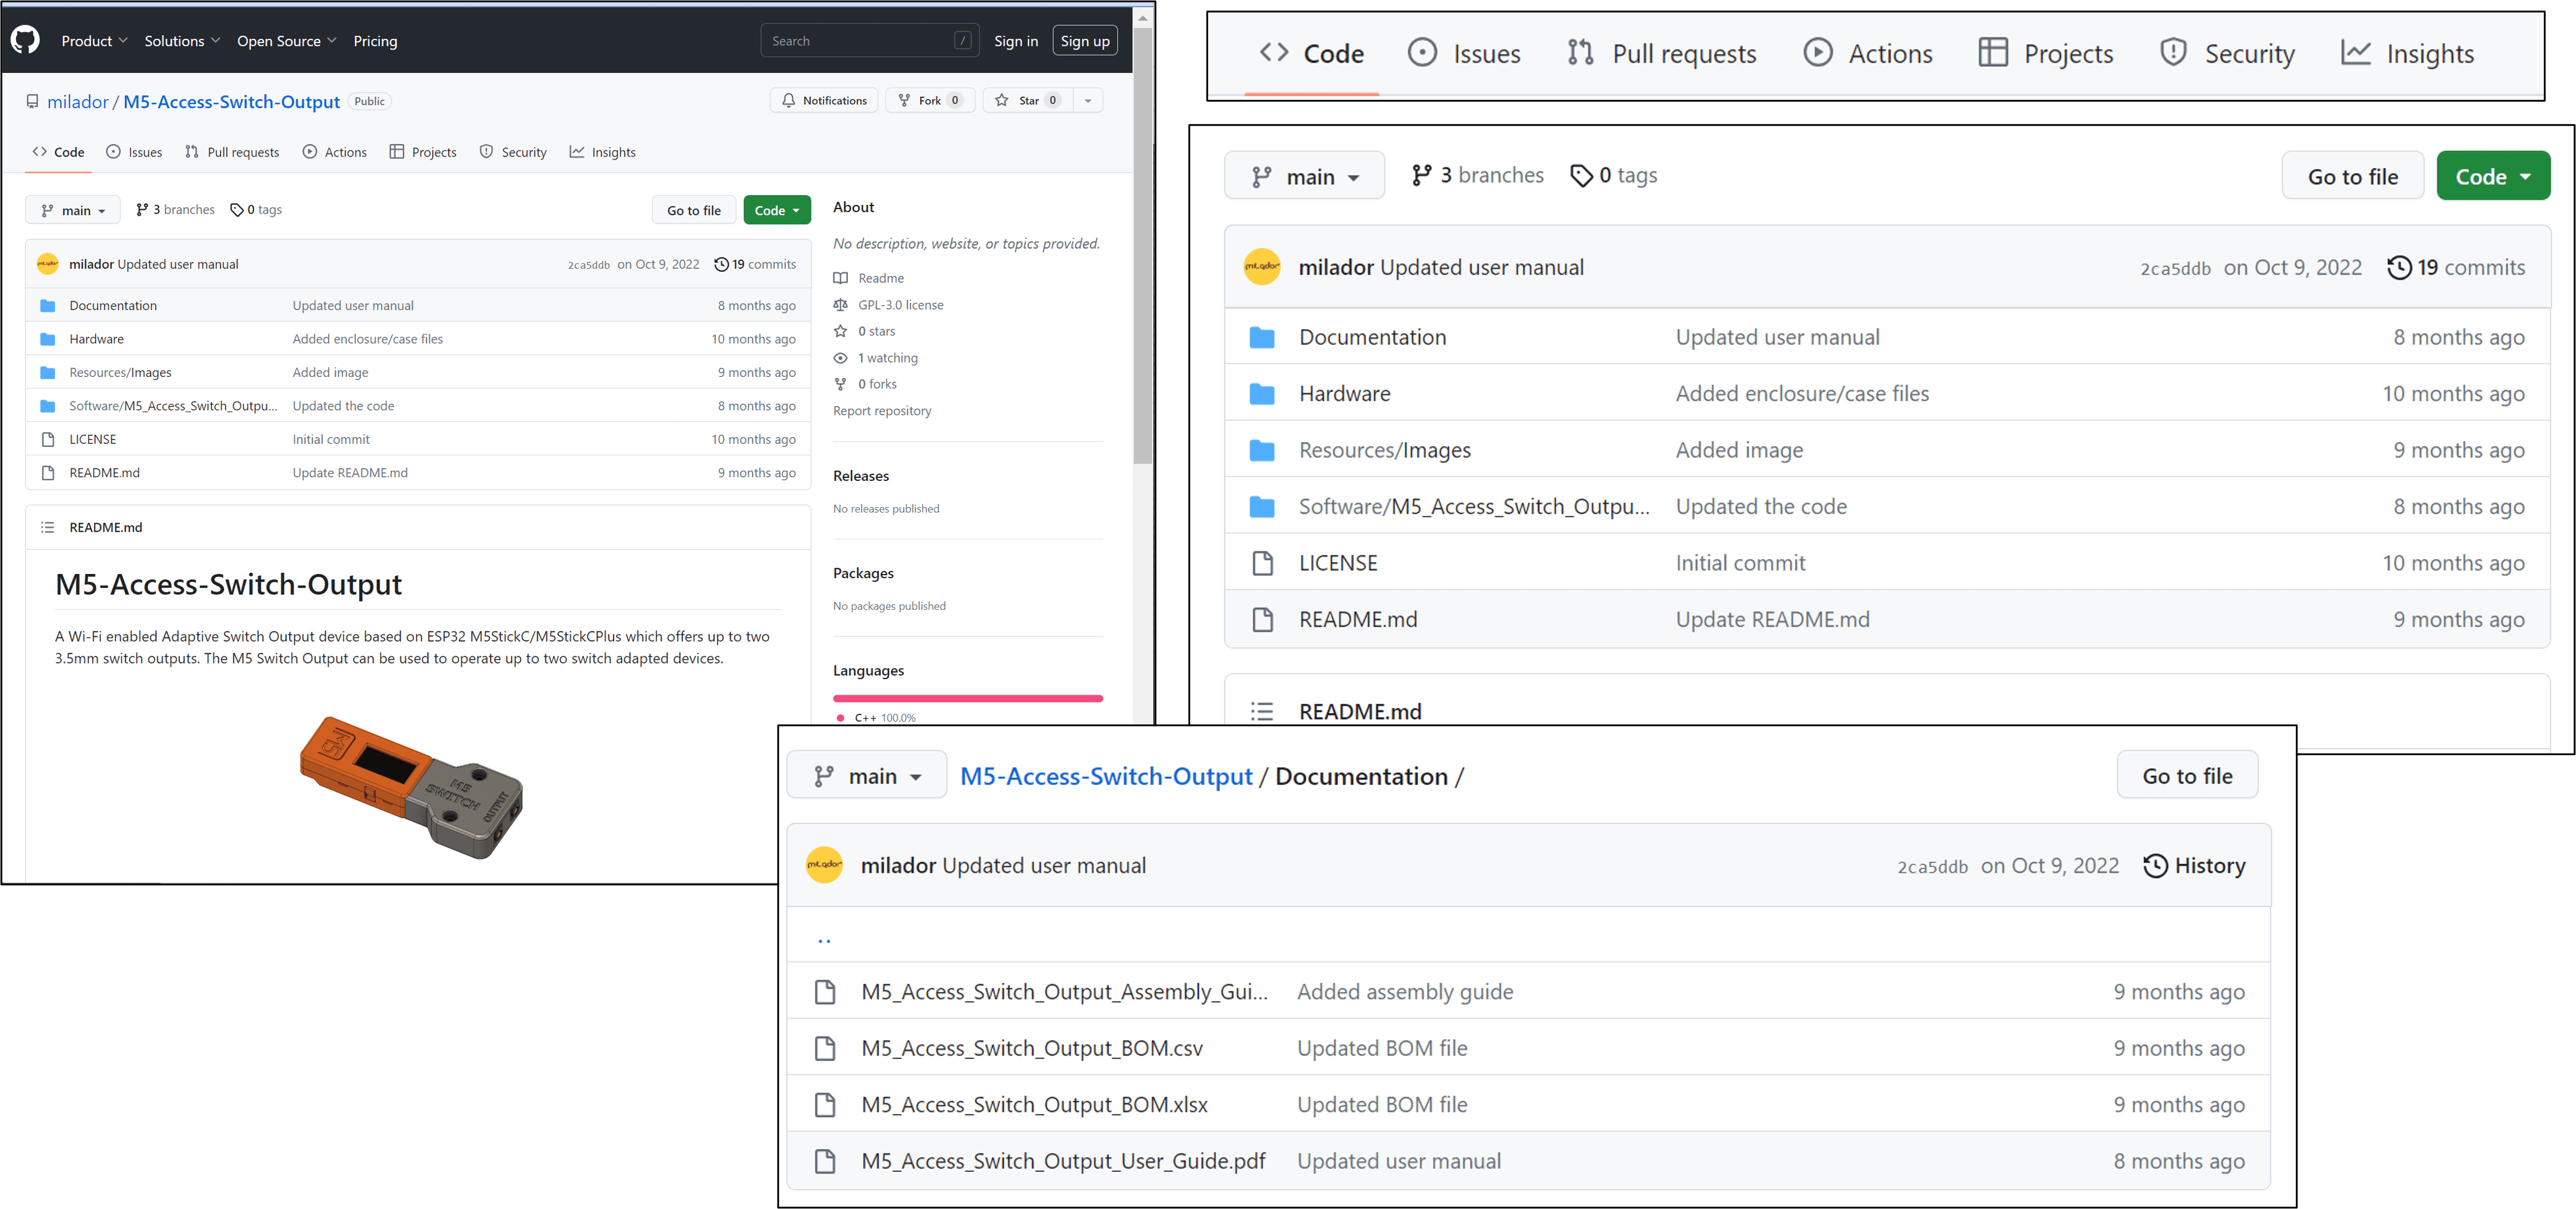
There are entire books “for Dummies” that have been written about how to navigate this user interface – and they’re written for software developers…

What barrier have you erected for your makers (who include therapists and families) if you put GitHub in their path to trialing your device?
Create a Web Page(s) for Your Design
- Instead, use web pages with pictures and videos to describe what your device is and why anyone should care.
- Everyone knows how to use a webpage or a set of linked web pages, and everyone knows how to play a video.
- YouTube will host your videos for free, and you can purchase a web domain and hosting service for a couple of dollars a month.
- Building a web page is free and easy to do with a tool like WordPress. If you do, it will automatically be viewable on both computers and mobile devices.

Instructables is a Reasonable Alternative – but flat
- If you don’t want to create and manage your own website, Instructables is a reasonable place to keep your files and assembly instructions.
- Instructables requires your device description to adhere to a simple structure: introduction, parts list, and step-by-step instructions for the assembly.
- You can link to external web pages and videos, but you can’t create a hierarchical set of linked pages. It’s one page per “project.”
- The site supports others in messaging you and following your work.

No Matter What, List Your Design at Makers Making Change
Whether you put your design on Instructables, Thingiverse, or your own website, be sure to add your design to the Makers Making Change website – for free.
Makers Making Change is dedicated to DIY assistive technology solutions. Best of all, they curate the device list – meaning that they print and test each item to ensure that it is buildable and can do what it says it can do. There are items on Thingiverse that can’t even be 3D-printed.

Why Makers Making Change?
Here’s the vision of MMC (my emphasis):

For me, the key is that they focus on leveraging the skills of a variety of individuals, including traditional makers, disability professionals, and volunteers.
This is a very active organization (my emphasis):

Funding and Longevity!
- Makers Making Change (MMC) is a program of the Neil Squire Society. The Neil Squire Society has been active for 39 years and is funded by the Canadian government along with other corporate and public sources.
- MMC has actual employees on salary. It’s hard to express just how unique this is for a group focused on DIY AT.
- They also have a goal of being more than a repository for DIY AT. They want to bring together diverse teams of individuals to create solutions and solve problems.
- It’s critical that we help this organization become the first place that teachers, therapists, AT professionals, caregivers, and individuals with disabilities go to when they want to know what DIY options are available.
- Ensure that everyone you talk to knows about them.

A Contact Us Page and Feedback Forms
The communication should go both directions!
Give people a way to contact you. The best ideas for improving your devices and ideas for new devices will come from users and the people who support them:

Put feedback forms on web pages along with your design descriptions:

Eliminating Barriers to Adoption
So you’ve got a great idea, assembled a multi-functional team, and designed a device that considers all of the “design for X’s.” How do you encourage adoption by the public?
The secret is not to introduce the right number of carrots and sticks. The secret is to eliminate all barriers to adoption – in particular, the barriers that you can’t see at first glance. Brainstorm a list of potential barriers. Begin by consulting with your team and then move on to asking your early adopters and individuals who attend your presentations.
Make a concerted effort to find solutions to and ways to mitigate these barriers.
The Hidden Brain podcast explores this topic in depth in their episode titled Success 2.0: The Obstacles You Don’t See.
How much can you charge for what you do?
- Yes, you should be able to recover the cost of materials, postage, and packaging—if you want, but you don’t have to.
- Yes, you can set up a donation page or link to a donation service.
- Yes, you can license your design in order to require attribution and, optionally, prohibit commercial use.
- Yes, you can accept remuneration for presentations at conferences (if offered).
- Yes, you can charge for travel, lodging, and time spent away from home to provide workshops in the design and implementation of your devices.
- No, you can’t charge for your time designing, developing, and building these devices – volunteers, first and foremost, give of their time.
- No, you can’t charge for wear and tear on your tools, nor can you charge for the electricity your tools use. What’s the alternative? You bought that wonderful 3D printer because you wanted to make things! Now you’re making things!
MY OPINION: If you want to profit from being a Maker, you’re not a Maker – you’re a Vendor. And that’s OK. If you decide to take this route, ensure that you’ve considered everyone else who may have contributed to your design and whether they should share in any profits. That includes all members of your design team and the early adopters who gave you feedback.
The Happine$$ Curve
It’ll be natural for people to have a range of expectations and experiences with your device.
That will lead to a range of satisfaction, from disappointed to elated.

If you charge for your device, you will hear, almost exclusively, from these people:

If you provide your device or service for free, you will hear almost exclusively from these people:

If, on occasion, you hear from people less than completely satisfied, they will go out of their way to provide you with constructive feedback and suggestions.
Which of these two scenarios will make you feel most fulfilled as a Maker?

The Dark (and Light) Side of 3D Printing
Just because you can, doesn’t mean you should… 3D printers can seem very powerful, and they are, but they’re not appropriate in all cases.

What Assistive Technology is completely inappropriate for a 3D-printed, DIY solution? How about crutch tips?!
The following quotes came from the 18th International ACM SIGACCESS Conference on Computers and Accessibility (2016): Uncovering Challenges and Opportunities for 3D Printing Assistive Technology with Physical Therapists – McDonald, Comrie, Buehler, Carter, Dubin, Gordes, McCombe-Waller, Hurs
“PT professors believed 3D printed crutch tips could replace missing crutch tips on their pre-existing crutches.”

They’re wrong! They don’t understand the limitations of the technology.
- The cost of a commercial crutch tip is about $6.60
- The cost of a 3D printed crutch tip is about $ 1.50
-
The cost of a fall due to a crutch tip failure could be catastrophic.
Avoid printing items that could cause significant injury if they fail.
The Pros of 3D-printing Assistive Technology
With that in mind, there are several undeniable advantages to using a 3D printer to produce your AT device:
- These are general-purpose machines and inexpensive. The “mass customization” model of 3D printing is only possible because the printers are inexpensive, general-purpose machines. The low operating costs, in terms of filament and electrical power used, facilitate the iteration of a design or implementation until it’s “just right” for the final user.
- The time from concept to prototype/product can be very short. Printing can begin just a few minutes after a design has been translated into the printer’s language, and most prints are complete in a few hours.
- Open-source designs are freely available. Ready-made designs are often available online and just waiting to be downloaded – meaning that the design phase of manufacturing can be minimal. For individuals interested in designing their own AT, free and powerful computer-aided design tools are available to download or use directly online.
- Local fabrication facilitates consumer involvement. 3D printers are simple enough to use and of high enough quality that therapists, individuals with disabilities, and their caregivers can implement the device themselves – which means that they can be directly involved in the design and customization of the final device.
- Rapid iteration facilitates customization. 3D printing filament is inexpensive, and power consumption is very small, so if a design doesn’t exactly meet the needs or desires of the end user, it is simple and quick to modify the design and reprint a new version of the device.
The Cons of 3D-printed Assistive Technology
- Materials may have limited strength and temperature/UV stability. FDM prints are anisomorphic, meaning that their strength depends on the direction in which stress is applied. The weakest points of any print will be between printed layers. This shortcoming can be mitigated by considering how the device or part will be stressed and then using that information when orienting the model for printing. Because FDM printing involves thermoplastics, the 3D-printed object will have difficulty retaining its shape or strength under high temperatures. Plastics, in general, are negatively affected by UV radiation, making them a questionable choice for applications that require long periods of exposure to the sun.
- Open-source designs and devices are unlikely to have undergone testing to validate their safety and effectiveness. Open-source designs are usually created by technical people who are not professionals in the domain of AT. They also rarely undergo any testing beyond the use by a single, targeted individual, and little thought is given to safety issues. You shouldn’t make any assumptions about how well such a device will work for you. Fortunately, if it doesn’t work out, printing the device didn’t cost all that much. You should monitor the use of the device closely until you’re confident that it can be used safely. In general, you should avoid 3D-printed devices that will be stressed significantly or will be required for the stability of the user. Examples of devices that have been proposed for 3D printing, but I believe should be avoided, are portable wheelchair ramps and crutch tips. Devices (e.g., switches) that are intended to control other, powerful devices like a wheelchair should also be avoided.
- Liability for injury is unclear. While Open-source/Creative Commons licensing theoretically places responsibility for injury on the user of a design, even popular efforts like EnablingTheFuture.org and e-NABLE.org are unsure of the liability they might incur if a user of one of their devices is injured through the use of their prosthetic hands. It’s even less clear what the responsibility of the person producing the 3D print might be. Many therapists avoid DIY devices simply because liability issues haven’t been settled and Good Samaritan statutes don’t apply. More on that topic below.
Assistive Technology that is a good candidate for DIY & 3D Printing
- It presents rich opportunities for customization. Individuals with disabilities don’t fit the “mass market” model specifically because their abilities and needs vary so much. 3D-printing tools can easily modify an object’s size or shape just prior to printing, and filament color choices are almost unlimited. Still, the best AT device candidate will be a model that is highly customizable through built-in design parameters whose values can be set by the user prior to printing.
- All parts are greater than 10 mm and less than 250 mm on any dimension. Part sizes should fall within the build volume of a typical consumer-grade 3D printer. 3D printing is a slow process. Very large items will take a very large amount of time (days) to print. If they have to be printed in parts, and the parts then have to be assembled (usually by gluing them together), the aesthetics and strength of the final device may be affected or could require additional hours of post-processing. On the tiny end of the spectrum, the smaller an FDM printed part, the weaker it will be.
- It doesn’t need to support loads greater than 50 lbs. or temperatures greater than 150 degrees Fahrenheit. Without invoking fringe materials like polycarbonate filaments that require specialized 3D printer parts and greater expertise to print, 3D-printing filaments and the devices, they produce are not rated to support significant weight or operate outside of normal room temperatures.
- It doesn’t require transparency or softness and will spend a limited amount of time directly in contact with the user’s skin. Most 3D-printing materials produce rigid parts, and FDM-printed objects have a rough surface. These two characteristics can make them irritating if placed in contact with the skin for a long time. One could sand the surface of the part to make it smoother or wrap it in a softer material, but an optimal device would be one that goes directly from the printer into use, not one that requires lots of post-processing.
- It will likely require iteration to fit the individual physically, functionally, or aesthetically. A key feature of 3D printing is the ability to make changes to a design rapidly, print the modified design, test the modifications – and, if necessary, repeat the process with new modifications. A device that is a perfect fit for everyone, right from the start, will be much cheaper to produce commercially using mass production methods.
- All non-3D-printed parts of a device are inexpensive and can be assembled with minimal skill. The best DIY designs are very simple to assemble – simple skills and simple tools. Parts that snap or screw together are unlikely to become a barrier to therapists, individuals with disabilities, or their caregivers. There’s already significant friction in the system without introducing more by requiring advanced skills to assemble a device
- The device can be modeled as a collection of 2 and 3-dimensional shapes as opposed to purely organic shapes. CAD tools and 3D printers are optimized for creating and printing objects that can be specified as a collection of lines between points in space.
It is possible to form an organic object in clay and then 3D-scan it to produce a model, but a 3D printer will struggle to print it. Large amounts of support material will be required, or the object will have to be carefully sliced into sub-sections and then glued together after printing. Designs like these offer few opportunities for modification or customization without repeating the entire process from scratch.
Legal Liability
What if someone gets hurt?
- Are Good Samaritan statutes enough to protect you and those who work with you? Will Good Samaritan laws protect you? After all, you’re doing this out of the goodness of your heart – that makes you a “good Samaritan,” right? More on that below.
- Food-safe filament, design, equipment (stainless steel nozzle), and cleaning techniques. Is there such a thing as a food-safe filament? Not really, not at a reasonable price that your implementer will be willing to pay. One approximation is TPU which does really well retaining its dimensions when cycled through the dishwasher multiple times.
- DIY AT consolidation websites – where should you post? What should you expect from the site? Do they offer any protection from liability? Will that AT website protect you? Unfortunately, they can’t even protect themselves. They have disclaimers, but I’ve heard lawyers say that, in court, such documents aren’t worth the paper they’re printed on.
- Design and test for safety. Do your best to consider safety during the design process and warn people if you can imagine ways that a device could be misused. Small parts intended for handling by children should obviously carry a warning notice.
- Have the user sign a disclaimer. This approach will only work if you control who gets access to your designs and if you can ensure that they will sign and return a form. Here’s a disclaimer form that you might consider customizing for your own purpose but note, with the same caveat as above, it may discourage an individual from suing you but a lawyer won’t be deterred in the slightest!
- Charging for your device? I haven’t done a study, but I suspect that people are less likely to sue over a device that they got for free.
- Form a Limited Liability Company (LLC) – This could be the answer for you.
Good Samaritan Doctrine/Statutes/Laws
Let’s take a close look at Good Samaritan laws.
- They exist in all 50 states but vary significantly in what they cover.
- The Good Samaritan doctrine is used by those, who voluntarily choose to help others in need, to avoid civil liability for injuries they may have caused while attempting to provide potentially life-saving assistance.
- They were originally created in the 1970s to encourage doctors and other medically-trained individuals to help at the scenes of accidents.
- They may extend to non-medical personnel depending on the state.
- The three consistent elements of the Good Samaritan doctrine are:
- The care rendered was performed as the result of an emergency;
- The initial emergency or injury was not caused by the volunteer, and
- The emergency care was not given by the volunteer in a grossly negligent or reckless manner.
The bottom line…
- You’re not providing life-saving assistance.
- You’re not providing emergency care.
- These laws were created to encourage doctors and nurses to stop and provide care at the scene of an accident. You’re not a doctor, and this isn’t an accident.
You are not protected by Good Samaritan laws! They have nothing to do with your work.
Personal Liability Insurance
I spent time with two insurance companies, and all I came away with was confusion.
State Farm
- Your homeowner’s policy only covers injuries that occur on your property
- You need a “commercial liability umbrella insurance” policy
- $1 Million – $273/year
- $2 Million – $441/year
- But you’re not a commercial business. (You are if you form an LLC…)
Allstate
- Your homeowner’s policy can be used in this case. (Really? That’s not what State Farm says…)
- If your business is one of the 60+ recognized by Allstate, you can purchase a “business operation liability” policy.
- But your business (DIY AT maker) is not one of the types recognized by Allstate.
- You’ll never know whether a policy we at Allstate write until the Claims department has reviewed a claim – for which you need to have purchased the policy and have a claim against you! (This is an insurance Catch-22!)
Commercial businesses carry liability insurance. The cost of that insurance contributes to the cost of their products.
The closest you can come as a volunteer is to purchase “umbrella insurance.” Spend time with your insurance company to ensure that what they are willing to sell you will actually protect you.
As I said before, stay away from 3D-printed devices where someone could get hurt if your device fails.
What about becoming a Limited Liability Company (LLC)?
As the State Farm Insurance agent said, “If your business is one of the 60+ recognized by Allstate, you can purchase a ‘business operation liability’ policy.” What does that process look like, and is it worth the cost and effort?
There are two advantages to forming a Limited Liability Company (abbreviated LLC).
First, by law, your company’s activities are separated from those of your personal life. That includes any legal actions – like lawsuits. The term used to describe this separation is the “Corporate Veil,” – meaning that a litigant in a lawsuit against your company can’t look beyond that veil to see and access your personal assets – unless a judge agrees to “pierce” your corporate veil. (By the way, the veil works in both directions. Someone suing you “personally” can’t look beyond the veil at your business.)
Why would a judge agree to do such a thing? They might if you:
- Act fraudulently
- Act illegally
- Act more like a person and less like a business
- Are undercapitalized…
- Act negligently
This video touches on these topics:
I know that you’re not going to act fraudulently or illegally, so I’ll ignore those two and say more about the last three.
You need to look and act like a company. First and foremost, you need to create separate bank accounts and establish separate credit cards for your business. Never use company money to pay for your personal needs. And sign contracts as the LLC, not as a person.
Ensure you have enough money in the company to pay your projected bills or loans and address any liability.
The legal definition of negligence is “failing to act with the same level of care as a reasonable person would have in similar circumstances.” A reasonable person gives a reasonable amount of thought to safety and warns people of potential safety issues.
Carry liability insurance. It will go a long way to cover the last two issues.
If you’ve created a Limited Liability Company, why would you need liability insurance? The quote below comes from this site.
“With an LLC, you can mitigate your risks. However, even if you structure your business as an LLC, your assets could still be exposed, particularly if you are accused of being negligent. And legal costs can quickly add up, even if a claim has no merit.”
Note that as a business, you’re now eligible to purchase liability insurance!
I’ve formed an LLC. Here’s what I did and what it means for me.
- I started by spending 20 free minutes with a business lawyer to determine if an LLC was reasonable for me. He said that it was.
- I paid a small fee ($50) to register the LLC with the Colorado office of the Secretary of State. I’ll need to pay a smaller annual fee ($10) to stay registered.
- I got a free Employer Identification Number from the IRS and created banking and charge accounts for the business.
- I needed to think about how to report my income and expenses to the IRS. So, I got 10 free minutes with a tax lawyer.
- It’s a pain, but I have to keep track of my expenses. How much am I spending on this activity? It’s no longer a hobby, it’s a business. I also need to consider how this can be a revenue-generating enterprise, not necessarily a profit-generating enterprise. In fact, you never need to make a profit.
- The income and expenses of a single-member LLC “flow through” to my personal taxes. That means filling out a Schedule C and including it in my federal tax forms.
- I’m going to be able to “write off” the costs of purchases that I otherwise would have had to just ignore. It’s definitely more work to keep track of these expenses, but I’ll be saving money on my taxes. (In 2024, I was able to “expense” $10K associated with my business. That’s a savings of $2.2K in taxes.)
- Finally, I purchased $500K of business liability insurance from State Farm. Now my initial concern about being sued and losing my life’s savings is behind me.
Case Studies
- 3D-printed keyguards for tablets
- Bliss Tactile Symbols
- Voice It
Case Study – 3D-Printed Keyguards

While working on a master’s degree in special education, I discovered 3D printing. I recognized the opportunities for assistive technology and wanted to base my master’s project on 3D printing. I thought that keyguards might be a good device to choose for this purpose—particularly a way to help individuals easily create and 3D print a keyguard for themselves and for much, much less cost than a commercial keyguard. I also saw the potential for creating personalized keyguards by utilizing multiple filament colors and surface treatments.
I started by going to Thingiverse, a repository for 3D models, to learn more about the possibilities and what people had already done.
Keyguards on Thingiverse
I found several entries. Here’s an image of one of them:

I soon learned that a keyguard design depends heavily on the particular tablet, case, AAC app, and app layout. A full set of stand-alone keyguard designs would number in the tens of thousands. I then tried to devise a procedure for creating custom keyguards using a popular CAD program like Tinkercad or AutoCAD, but Tinkercad was too cumbersome, and AutoCAD had too great a learning curve. In the end, I abandoned that idea and instead proposed an architecture for customizable AT pressure switches.
Much later, I stumbled across OpenSCAD and immediately recognized its potential for empowering non-technical people to customize and 3D-print their own inexpensive keyguards.
Growth Through Feedback and Iteration
I knew that I would need help creating a keyguard designer that actually met the needs of therapists and users, so I turned to the QIAT mailing list for volunteers. I was overwhelmed by the positive response I received and realized that I would need help from people with 3D printers to support these therapists as they created their designs. For that help, I posted messages to a few Facebook groups dedicated to 3D printing and heard back from several volunteers – each of whom was willing to support multiple therapists. My job would be to facilitate their work and collect input for the first release of the keyguard designer.
That was four years and over 60 software versions ago. As the keyguard designer got more positive press and more users, its capabilities expanded. These users often encountered problems and limitations that they communicated through various feedback channels. You can get a sense of the designer’s growth by comparing the Customizer panes of version 1 of the designer to that of version 58 below.
 |
 |
|
version 1 (Apr. 10, 2018) |
version 58 (June 28, 2023) |
The designer is “currently” available as version 65 and will continue to improve as additional needs are identified and addressed.
Ready-to-Print Designs
One of the biggest redesigns to the keyguard designer came as a request from Christine Baudin, a co-founder of the AAC for the SLP Facebook group, to provide a set of “ready to print” STL files for popular keyguards on the Volksswitch website. She agreed to be “the decider” as to what tablets, cases, apps, and app layouts had to be supported. She also used her clout with vendors to get me free licenses for the chosen AAC apps.
The screenshot below is the home page for these designs.

This effort resulted in the creation of over 400 individual STL and SVG files for building 3D-printed and laser-cut keyguards, respectively. It also forced me to add new functionality to the designer so that one definition could be used to create multiple designs.
Most importantly, these “ready-to-print” designs addressed an important barrier for many therapists who wanted to make their own 3D-printed keyguards but didn’t have the time to learn how to use the keyguard designer.
In a related effort to reduce barriers, I worked with the people at Keyguard AT to have them provide a special, low-cost offer to laser-cut a keyguard if given a “ready-to-cut” SVG file.
Christine promoted these ready-to-print designs on her Facebook group and arranged for an interview on the Talking with Tech podcast.
Etsy Store Support
To further lower barriers, I’ve worked with two vendors on Etsy who will do the 3D printing for their customers. AdaptedCreations prints any of the ready-to-print designs upon request, while AACKeyguard works directly with the keyguard designer to create custom keyguard designs.


Volksswitch has no financial relationship with either of these Etsy stores. Instead, we benefit because these stores further our mission of getting our designs into the hands of as many individuals as possible. They also provide important feedback regarding the printability and durability of our designs and how both can be improved
Because of the way the keyguard designer is made available for use, I have no idea how many 3D-printed keyguards have currently (May 27, 2024) been produced, but if I was told that that number was more than 10,000, I wouldn’t be surprised.
Case Study – Bliss Tactile Symbols
Sometimes, projects come about through pure coincidence.

Tactile symbols are typically used to teach language and literacy to individuals who are blind or visually impaired, though they can be helpful as an alternative language system for anyone struggling to learn language.
Traditional tactile symbols are made by gluing some physical object to a rigid backing:

This is the Texas School for the Blind and Visually Impaired symbol for “clothing.” Given the variety of teachers in this field and all the handling that the symbols experience, such symbols are somewhat arbitrary and very fragile. They’re also hard to replicate with fidelity.
These clever 3D-printable tactile symbols are from Project Core at the University of North Carolina:

After making several presentations about 3D-printed assistive technology, an SLP contacted me, saying she was having trouble printing one of these symbols. I discovered that the symbol had been modeled with the top ring extending slightly below the bottom surface. That made printing impossible without extensive support, and she knew nothing about supports or how to determine if a print required them. I trimmed off part of the ring in my slicer and sent her an STL file that would sit flat on the print bed.
I was intrigued by the idea of 3D-printed tactile symbols. The Project Core symbols were sturdy and highly replicable. But there were only 36, which seemed to overly limit opportunities, for conversation and literacy. Additionally, the choice of raised shape seemed entirely arbitrary
I thought, why not leverage the graphic images, that were already part of the Project Core Vocabulary, and create a symbol designer, that could utilize any, of the hundreds of standard PCS graphic images, to create custom tactile symbols.

I called these the “Project Core Remix” symbols. Again, I needed to assemble a team of SLPs who were working with blind and visually impaired individuals. I turned to my keyguard team to suggest volunteers and found four. We worked together for about four months but had trouble making progress…
Fundamentally, pictures make for lousy tactile graphics.

They’re tactilely complex and rely too much on concepts like color and perspective that are meaningless to a blind individual. They also don’t lend themselves to 3D printing because of the fine lines involved. I felt like we had reached a dead end, but at the same time, I felt that 3D-printed symbols were singularly special.
Then an idea came to me, from out of the blue – Blissymbols!

I first learned about Blissymbolics in college decades ago. They are simple shapes logically constructed to represent an entire language, and they’re perfect for tactile exploration.
I went back to the QIAT mailing list and asked for volunteers to help with the creation of a symbol designer. Eight SLPs and teachers of the visually impaired responded. I met a TVI at a conference and another SLP in an AT Maker’s group monthly video call.
When I described what I was planning, they also wanted to get involved.
The result of that work was the Bliss Tactile Symbol Designer – also implemented in OpenSCAD:

In order to ease its introduction, it comes with definitions for 242 symbols and the ability to modify the existing definitions or create entirely new ones.
The next order of business was to identify additional barriers to adoption. The team was unanimous, that there needed to be an easy way, to manage and transport the symbols. A suggestion was made to look at some of the products by Augmentative Resources. I contacted the company, and asked if they’d be interested in designing and selling, a carrier for our Bliss Tactile Symbols. They agreed, and here’s the result:

Don’t underestimate the chance that other people, even commercial companies, will support you in reaching your goals.
A second potential barrier had to do with supporting teachers in utilizing the symbols in the classroom. So, the team developed a few documented introductory teaching plans:

And remedial, and motivational tools:


Some people may be more comfortable purchasing 3D-printed devices and symbols rather than making them. The 3D Learning Shop on Etsy had already made a business of printing and selling the Project Core symbols. So, I contacted them about printing and selling our Bliss Tactile Symbols – and they agreed. This webpage shows one of their offers:

A very active member of the team, had her own creative ideas for using the symbols and took them to shows and conferences in Texas:

Six members of the team co-presented with me at the Closing the Gap, Assistive Technology Industry Association, and California State University-Northridge AT conferences or made recorded interviews to include in those presentations.
Three team members and I wrote an article about the symbols that was published in the magazine associated with the Closing the Gap conference.
Closing The Gap Solutions, June / July 2023, (Volume 42 – Number 2).
Case Study – The Voice It

During one of the Bliss Tactile Symbol design team meetings, a member asked whether I’d ever heard of the ProxPAD from Logan Tech:

The device costs about $2500. You can place a card near the box, and if it recognizes the card, it will play audio about the card. She wondered if something like that could be done with the Bliss Tactile Symbols. I said that it seemed possible, and I guessed that the technology being used was RFID. I predicted that a DIY version of the device, with greater customization capabilities, could be built for 1/20th the cost. That was the genesis of the Voice It project.
Along with the members of the Bliss Tactile Symbols team, I recognized that we would need people with expertise in electronics and enclosure design. I turned to the Makers Making Change Forum and asked for help. I quickly heard from one member who responded by saying that this was a job for an Arduino, and he had expertise in writing Arduino code. Another member answered, saying that he had a background in RFID and enclosure design. The Voice It never would have come into being without them.
From the start, a lot of thought went into the design to ensure that the Voice It could be assembled by a non-technical person. All non-3D printed parts had to be available off-the-shelf and it couldn’t require soldering or wire stripping. Here’s what the Voice It looks like before bringing the two halves of the enclosure together:
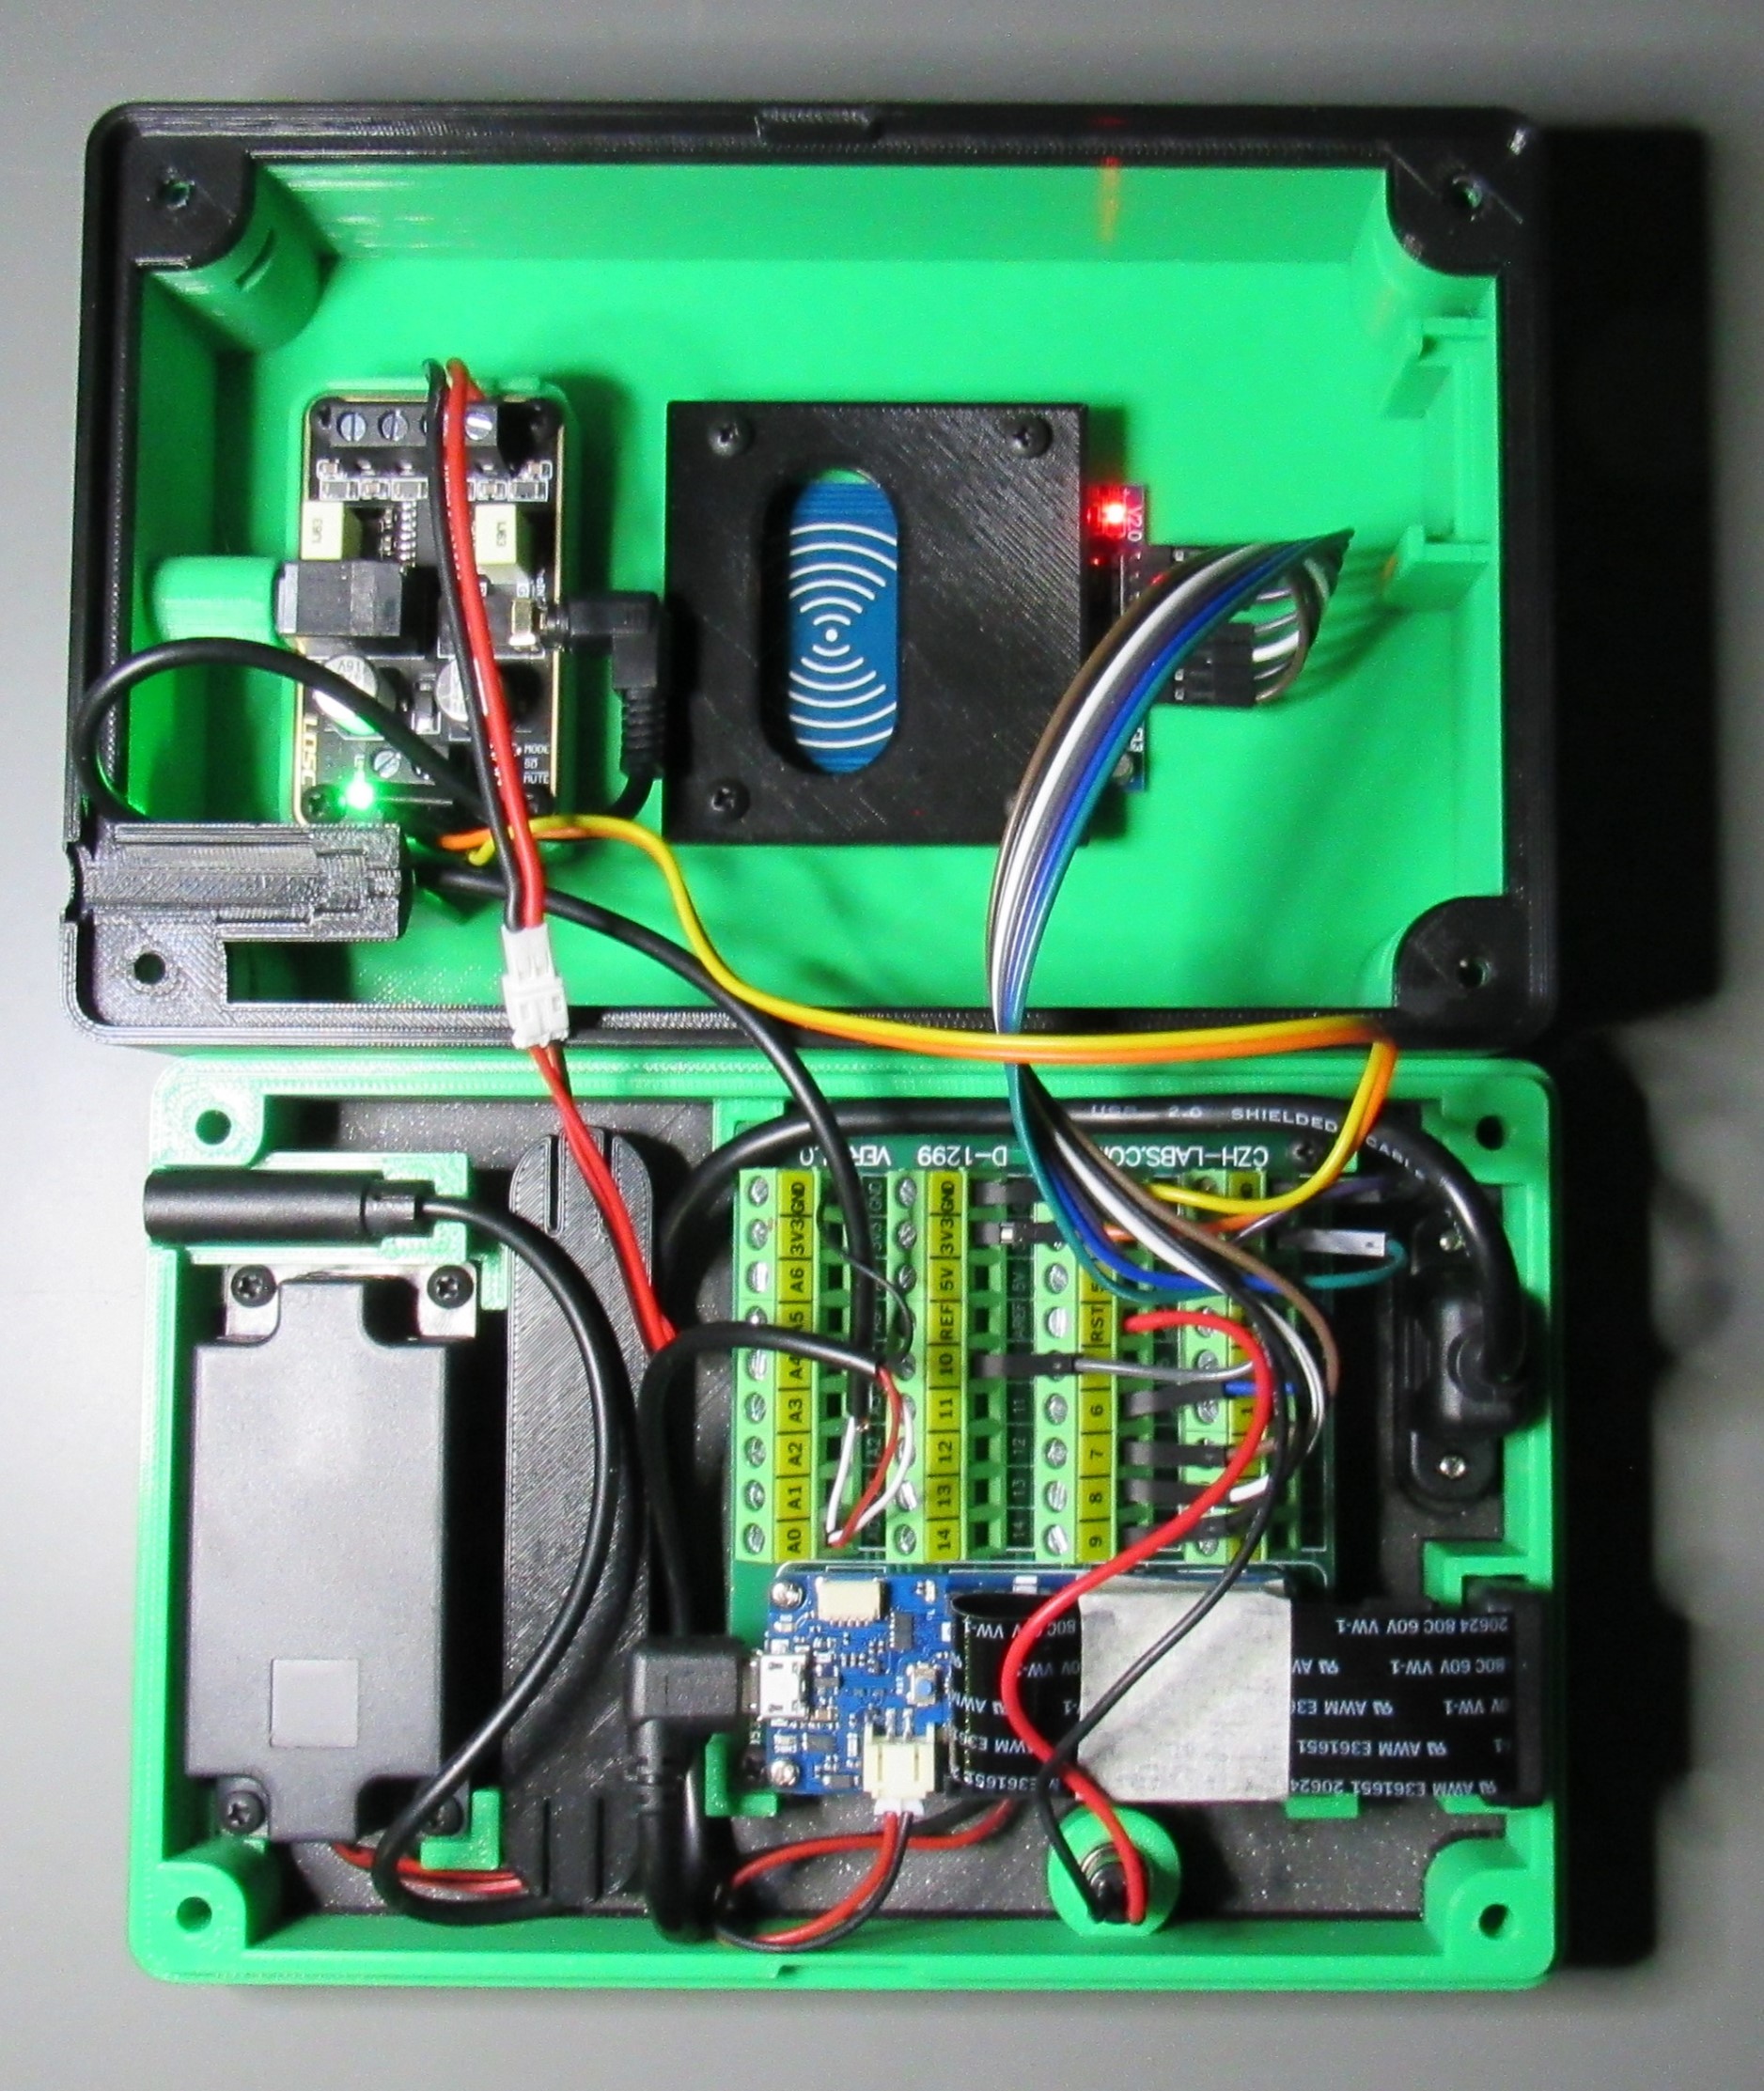
The non-3D printed parts are available from Amazon, and the Voice It can be assembled with a small screwdriver in about 45 minutes.
Detailed installation instructions were written, including periodic testing of the assembly. A video was also created to show the process of putting the pieces together.
The final cost of parts is approximately $125, resulting in a cost savings of $2,375 compared to a ProxPAD.
As a further effort to reduce barriers, free audio files were provided for all 242 Bliss Tactile Symbols in both English and Spanish.
The Bliss Tactile Symbol designer was modified to support the insertion of an RFID tag during the printing process, which would later be encoded with the English version of the word represented by the symbol (the Voice It would choose the Spanish pronunciation if requested):

The Voice It is now included in every presentation about the Bliss Tactile Symbols and has been enhanced to read bar codes for playing a prepared recording of a children’s book or the contents of a pill bottle – or any object with a bar code, which is just about every product that can be purchased.
In Summary: What makes for successful design and implementation?
Here are the key concepts that I’d like you to remember if you want to be successful in getting your design into the hands of as many people as possible.
- Assemble a diverse/multi-functional team. You don’t know it all. You don’t even know half of what you don’t know. Get help from other, knowledgeable people.
- Consider the entire Device (Product) Development Life Cycle – are you considering all stages, and do you have representatives for each stage on your team? Your customer, will experience the entire product lifecycle, so consider each stage as you do your design.
- Know the characteristics of a good DIY AT candidate. Don’t fall victim to the “shiny new hammer” fallacy. Think about whether the device is a good candidate for 3D-printed, DIY, AT, and consider whether a commercially available product will already adequately meet the need.
- Consider all the “abilities”: customizability, personalizability, assemble-ability, testability, maintainability, supportability, and modularity, as part of the design process. Think about customization, personalization, ease of assembly, and maintainability, and then build them into your design from the start.
- Off-the-shelf components should be utilized where possible (reduced upfront cost, reduced development time, lower lifecycle costs, ability to leverage new technology more quickly). Don’t build a component that can be purchased. If it can’t be purchased, reevaluate your design. The last place you want to be is in the critical path, selling components. That will make your device easier to assemble and future-resilient, if not future-proof.
- Design for 3D printing (that you won’t be doing). You’re not doing the 3D printing. So, don’t make assumptions about the people who will be.
And Finally…
No matter what, an effective maker must be humble and willing to listen to others!
A maker with a huge ego shuts down communication and increases the probability that their design will never be used.

Do you have any thoughts you’d like to share on this topic? Please provide some information below:

