

Chromebooks are used in many school districts across the United States. A keyguard can make a Chromebook more accessible for individuals with motor disabilities. Each Chromebook will have a slightly different keyboard layout.
Keyguard AT sells laser-cut acrylic keyguards for several Chromebooks – including the Lenovo 300e. Our keyguard is designed to fit tightly to the keyboard, so the tablet can be closed without damaging the screen, and provides tabs that can be used to attach the keyguard reliably to the laptop using double-sided tape.
This video describes the whole story:
You can obtain the STL file(s) for our keyguards on Printables. You may see two STL files. One is designed to rise 0.5 mm above the surface of the laptop and the other is designed to rise 1 mm above the surface. The first one allows the laptop to close more fully than the second but the second may be needed to provide more resistance to movement after settling on a particular key.
To download STL files for these particular Chromebooks, click on their links below:
- Lenovo 300e Chromebook or Lenovo N22-20 Touch
- Dell Chromebook 11
- Dell Chromebook 11 P22T
- Samsung Chromebook 4
- Acer Spin 714 Chromebook
- Lenovo 300e 2nd Generation
If you have a Chromebook and it’s not in the above list, or if you’d like to change our design for one of the keyguards above, you can use our Chromebook keyguard designer to create a keyguard for your Chromebook.
Designing Your Own Chromebook Keyguard
Begin by going to the Printables page for the Chromebook Keyguard designer. Download two files from the Printables “Files” tab: chromebook_keyguard.scad and chromebook_keyguard.json. Place both files in the same folder.
When you launch chromebook_keyguard.scad from within OpenSCAD, you’ll see an image like this:

This is the perimeter of the keyguard along with mounting tabs. If you launch chromebook_keyguard.scad and don’t see this image, try choosing Design > Preview. If you still don’t see it, try rotating the scroll wheel on your mouse.
At the top of the Customizer pane, you’ll see some controls associated with Presents. Press the “+” button:

Next you’ll see a pop-up window that will allow you to name your preset:

Once you’ve created a new preset, press the “save preset” button when you make changes to the design options.
The Customizer pane has a set of sections, each with a list of options for your keyguard:

You can expand each of these sections to set individual options for your keyguard. We recommend that you start at the top and work your way to the bottom. Follow the instructions below to design and print your Chromebook keyguard.
Modifying the Design to Match Your Chromebook
We’ll begin by creating the outer border of your keyguard.

Begin by expanding the Keyguard Perimeter section:

Start by measuring the height and width of your keyboard.

Enter these values for the “keyboard width” and the “keyboard height”. Note that all values should be in millimeters and note that you can use decimal values. You may find that you have to add a couple of millimeters to these values to ensure that the keyguard perimeter doesn’t interfere with the up/down movement of the keys.
The keys on a Chromebook typically sit down inside a recessed area of the keyboard. The “key depth” value is intended to capture the depth of the recess. The “keyguard rise” value is intended to capture how high the keyguard will rise above the level of the keys. The higher the rise, the more effective the keyguard will be in preventing an individual from accidentally pressing the wrong key. Unfortunately the higher the rise the harder it will be to close the Chromebook with the keyguard in place.
A “keyguard rise” value of 0.5 mm produces a keyguard that looks like this:

While a value of 3 mm produces a keyguard that looks like this:

Probably too thick to safely close the lid. While creating drafts of your keyguard – especially the perimeter and row separators, it may be useful to set the keyguard rise value to 2 mm so that the printed draft is rigid enough to get a good sense of fit to the keys. Once you’re adding key separators to your draft, you can change the value of “keyguard rise” to a more appropriate number.
A value between 0.5 mm and 1.0 mm seems to be a good compromise.
Now measure the distance between the bottom of the ctrl-key and the outer lip of the trough around the keys. Repeat for the left side of the ctrl-key.

Enter the smaller of these two values for “perimeter width”. For now, use the same value for “keyboard corner radius”. You can adjust the value once you’ve printed the first draft of your keyguard.
If your Chromebook keyboard sits in a recessed region of the computer, you should set “angled perimeter” to “yes”. If the keyguard will sit on a flat surface like this:

set the value of “angled perimeter” to “no”.
Hold off, for now, on putting a value in “left side gap”.
Tabs
Next you will adjust the size and position the upper and lower tabs:

What you’ll want to do is find space for as wide a tab as possible. The lower tabs can be relatively large, but the upper tabs will need to avoid the Chromebook hinges. The following figure shows the parameters that determine the size and location of the upper tabs (similarly named parameters determine the size and location of the lower tabs).

- A = upper tab inset
- B = upper tab width
- C = upper tab depth
If your Chromebook keyboard sits in a recessed region of the computer, you should set “upper tab thickness” and “lower tab thickness” to “0”. If the keyguard will sit on a flat surface, you can increase the tab thickness to fill the gap that would otherwise exist between the bottom of the tab and the flat surface. To fill the entire distance just set the value to a large number like 5 mm.
It’s now time to print a “draft” of your keyguard – just the outer perimeter. Choose Design > Render. When the rendering process completes, choose File > Export > Export as STL. Slice and print your keyguard perimeter. Note that the keyguard will print upside-down to eliminate the need for supports.
Test how well the keyguard fits your keyboard. This is a critical first step so take your time and get it right. It may take several prints. Ultimately, you want the keyguard to sit down into the groove around the outside of the keys, and the tabs should sit flat on the Chromebook surface.
If your keyguard is sitting too high off the Chromebook surface and that fact doesn’t appear to be related to an interference between a key and the keyguard, you can try decreasing the value of “key depth”.
Click the “save preset” button to save your work so far.
Adding the horizontal rails
The next step is to add the horizontal rails.

Measure from the bottom of the keys to the center of each horizontal gap.

Enter these measurements into the corresponding options in the Row Separators section:

Each option is named based on the key that sits at the left end of the row below that gap. The options represent the height of the gap above each row so the very top row of keys, with the “esc” key at the left, isn’t included.
Now set “show row separators” to “yes”, render the design, export this next draft as an STL file, slice and print.
Again, test the fit of your draft keyguard. Adjust the height of the rails as necessary until it easily slips into place and doesn’t interfere with the up/down movement of any keys. Remember that you can use decimal values in setting the height of a separator. Stick with whole or one-half millimeter adjustments to your values. You probably won’t see any benefit from greater precision.
Click the “save preset” button to save your work so far.
Adding the vertical rails and the plastic around the arrow keys.
This is the longest and the most tedious step.
You’ll measure the distance from the left edge of the left most key in each row to the center of each gap between the keys in that row.

The best way to do this is to lay a ruler along the center of the keys in a row; place the zero point on the ruler at the left edge of the left-most key; and record the value on the ruler at the center of each gap. Don’t move the ruler until the last gap has been measured. Again, try to stick to whole millimeter values at first and add or delete one-half millimeter from that value if a separator is crowding the key on one side or the other. Don’t try to get more precise than that.
Start with the bottom row of keys and move up, one row at a time. Print a new draft of your keyguard with each row and ensure that the keyguard fits well before moving up to the next row. It’s a little more complex, but you can save time by adding the key separators for all rows at once and then make adjustments as necessary. It’s more complex because the draft will likely have to sit on top of the keys, and you’ll need to be careful to keep the left edge of the draft in place as you adjust your measurements.
The bottom row of keys starts with the ctrl key so the options for key separators for that row can be found in the “ctrl row key separators” section:
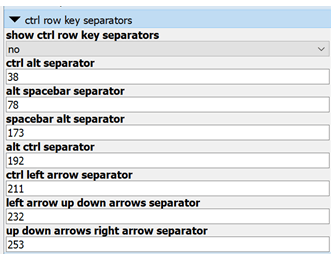
Each option is named based on the key that sits to the left and the key that sits to the right of each gap. So the “ctrl alt separator” option represents the value of the middle of the gap between the “ctrl” key and the “alt” key.
Fill in the values for each of the measurements you’ve taken and then change the value of “show ctrl row key separators”. You should see an image that looks something like this:

Remember that the keyguard is laid out and printed upside down so the key separators will look backwards from what you see when looking at the keyboard.
Render the design, export this next draft as an STL file, slice and print. Test the fit of your draft keyguard. If the keyguard needs to be adjusted, stick to whole and half millimeter changes in values. If you’re confident in your adjustments, you can save some time by entering values for the next row of separators and printing your next draft. A Chromebook keyguard uses very little plastic so if you don’t mind going slow you can make your troubleshooting easier.
Click the “save preset” button to save your work after each row.
At any point, you can adjust the width of the row and key separators in the Separator Sizes section:

Now measure the gap above the left arrow key and the right arrow key. Subtract about 1 mm and enter the result as the value of “arrow key mask height”:
![]()
Set “show arrow key mask” to “yes” and print your last draft – maybe even your final keyguard…
Print and test the fit of the keyguard. If all the key separators appear to be shifted to the left in the gaps, it probably means that there’s too much of a gap between the outer keys and the inner edge of the keyguard. You can adjust for that by changing the value of the “left side gap” parameter. We’ve already set it to 1 mm. Try adding or subtracting 1/2 mm from that value and see how that change affects the fit of your keyguard.
Click the “save preset” button to save your final design.
That’s it! If you’ve come up with a layout that fits your Chromebook well, be sure to upload the STL files for a 1/2 mm and 1 mm rise to Printables- and include a reference to this page so others can follow in your footsteps.
You can also send information about your design to us and we’ll include your measurements in our next version of the program. Just fill out the form below and tell us that you’ve come up with a new design. We’ll be in touch to have you send us the information that we need.
Do you have any ideas about how to improve this design? Provide some information below:

