
The Bliss Tiles an Puzzle Designer was built exclusively to create tools and scaffolding to support students in their quest to learn to communicate via Blissymbols. The designer can be used to create static/solid tactile explorers to introduce blind and visually impaired individuals to increasingly more complex tactile shapes – lines to angles to triangles to squares, or dots to curves to circles to hearts.
The designer can also be used to create tools for matching target shapes to a variety of shape options – these are called challenge tiles. The designer can incorporate full Blissymbols when you want to teach how a more complex symbol is constructed by superimposing or joining simpler symbols.
Finally, you can insert even more fun into your instruction by creating puzzle scenes comprised of Blissymbols. Start with an “explorer” of the scene, then cut out the Blissymbols as puzzle pieces that can be inserted into a base layout to recreate the scene.
The best way to understand the capabilities of the designer is to explore its user interface and see the impact of choosing various options.
Getting Started
If you haven’t already downloaded the zip file containing the Bliss Tactile Symbol designer, you’ll need to do two things before you can begin using the Bliss Tiles and Puzzles designer:
- Go to Printables and download the Bliss_Tactile_Symbols.zip.txt file you find there. Delete the “.txt” part of the file name and then expand the contents of the ZIP file in a convenient location.
- Open that folder and you’ll see four folders and five files:

The designers (.scad files) work in tandem to achieve different results. This picture shows how you start with a Blissymbol SVG file, transform it into an STL file, that can then be incorporated into a tactile symbol, an explorer, a challenge tile, or a puzzle:

On this page, we focus on the last step on the right and the use of the Bliss Tiles and Puzzles designer.
The “Bliss Tiles and Puzzles.scad” file is the symbol designer and the .json file by the same name contains a set of saved configurations (called Presets).
- Next, you need to download and install the free program, OpenSCAD. Instructions can be found here.
Launch (double click on) the “Bliss Tiles and Puzzles” OpenSCAD program in the “Bliss Tactile Symbols” folder. You’ll see a window that looks like this:

The display pane is showing a simple base with no content. You’ll add that content as you step through the options in the Customizer pane.
The Customizer pane has a “Presets” region where you can select designs that we have already created for you but you might need to modify:

The presets include a collection of “templates”, or starting points, that you can use to create explorers and challenge tile sets.
Below the Presets are a set of expandable sections where you define your explorer or challenge tiles board:

We’ll look at each section and see how choices there affect your design.
The Customizer Options
Part Section
The Part section allows you to select which part of your board to display in the display pane. It’s also the part that will get rendered when you choose to render your design.

The Bliss Tiles boards are comprised of a base and zero or more tiles. You render and print the base and each tile separately. Select base or tile from the “part to print” pull-down list.

If you want to print an individual tile or puzzle piece you must also choose which tile or puzzle piece. You can have up to 20 tiles or puzzle pieces on your board:

Finally, you can change the overall size of a puzzle or tile set by adjusting the scale. You can double the size of the parts by changing the value from 100% to 200%. This modifies only the height and width of all the parts. You separately control the thickness of the parts. Two things to note… First, changing the scale doesn’t change the height and width of the base. Since the base is the largest component and since it has to fit on your 3D-printer, we think it’s best that you manually adjust these values and verify that you have sufficient space on your build surface. The calculation is pretty simple. If your base is currently 120 mm wide and you rescale the parts to be 150%, then reset the width of the base to 120 x 150% = 180 mm. Second, one of the hidden costs of printing in multiple dimensions is that you incur cost for each dimension. So, if it takes you 1 hour to print a base at 100% then it will take you approximately twice as long to print the base at 200% – in each dimension. One hour times 2 for the x-dimension and then times 2 again in the y-dimension: 1 hour x 2 x 2 = 4 hours.
Base Options
The Base Options section contains those settings that apply to the bases of both tile sets and puzzles.
There’s not a lot here but these options are tied directly to the size of your 3D-printer and will determine if you can actually print your design.
Ensure that “base” is selected in the “part to print” pull-down list. The Base Options section will help you lay our your board:

The first thing you should decide is how large you want your board to be (width and height). This value will depend on several things – not the least of which is how large the build surface is on your 3D printer. [If you plan to outsource your printing, you should ask how large of an item (in the x and y dimensions) the printer can print.]
The number of shapes and how large you want those shapes to be will also affect how large the base will need to be. This is a delicate dance and you will probably come back to these options repeatedly as you tweak values to get just the look you want (and still keep it feasible to print).
Note that large rectangular shapes are notorious for warping at the corners during printing. If one of your dimensions exceeds about 100 mm, we recommend that you add a generous “brim” to your first layer to enhance adhesion.
You can choose a “base thickness” depending on how sturdy you need the base to be. Try 5 mm to start with and increase the value if necessary. A 5 mm board printed in PLA, with 15% infill and 2 perimeters, is actually very strong. A thicker board, with a higher infill value and more perimeters, will be even stronger (maybe unnecessarily so) and will require exponentially more filament to print – which translates as higher cost and longer print time.
Bliss Challenge Tiles
Tile Base Options
The Tile Base Options section determines the layout of your challenge tiles board.

These values will be more intuitive if we look at pictures of the base when you change their values. So before we go there, we’ll choose some shapes to put on the board. Let’s jump ahead to the “–Tiles-Piece” sections to give us something to work with…
The “–Tiles-Piece” sections look like this:

It’s a little ugly but creating a user interface in OpenSCAD is a bit limited. You can define up to 20 tiles to go on the board. For each tile element, you place a Blissymbol/word or a shape there. The word can be a core word or one that you placed in the “beyond core words” folder. You can also set the vertical location of that word or shape on that tile.
Set the number of rows and columns in the grid based on your needs. Your board can have as many as 5 rows and 5 columns. If you add targets to your board, the number of rows will effectively be doubled. You can only specify 20 values (tiles) in the grid, so a 5×5=25 cell grid will have 25-20=5 blank cells.
Note: the following example creates a challenge tile set from scratch. You can get a head-start by choosing the appropriate preset from the list of presets – in this case it would be the preset named “3 rows x 3 cols – targets”. However, the example describes some issue that you may still encounter and how to address them.
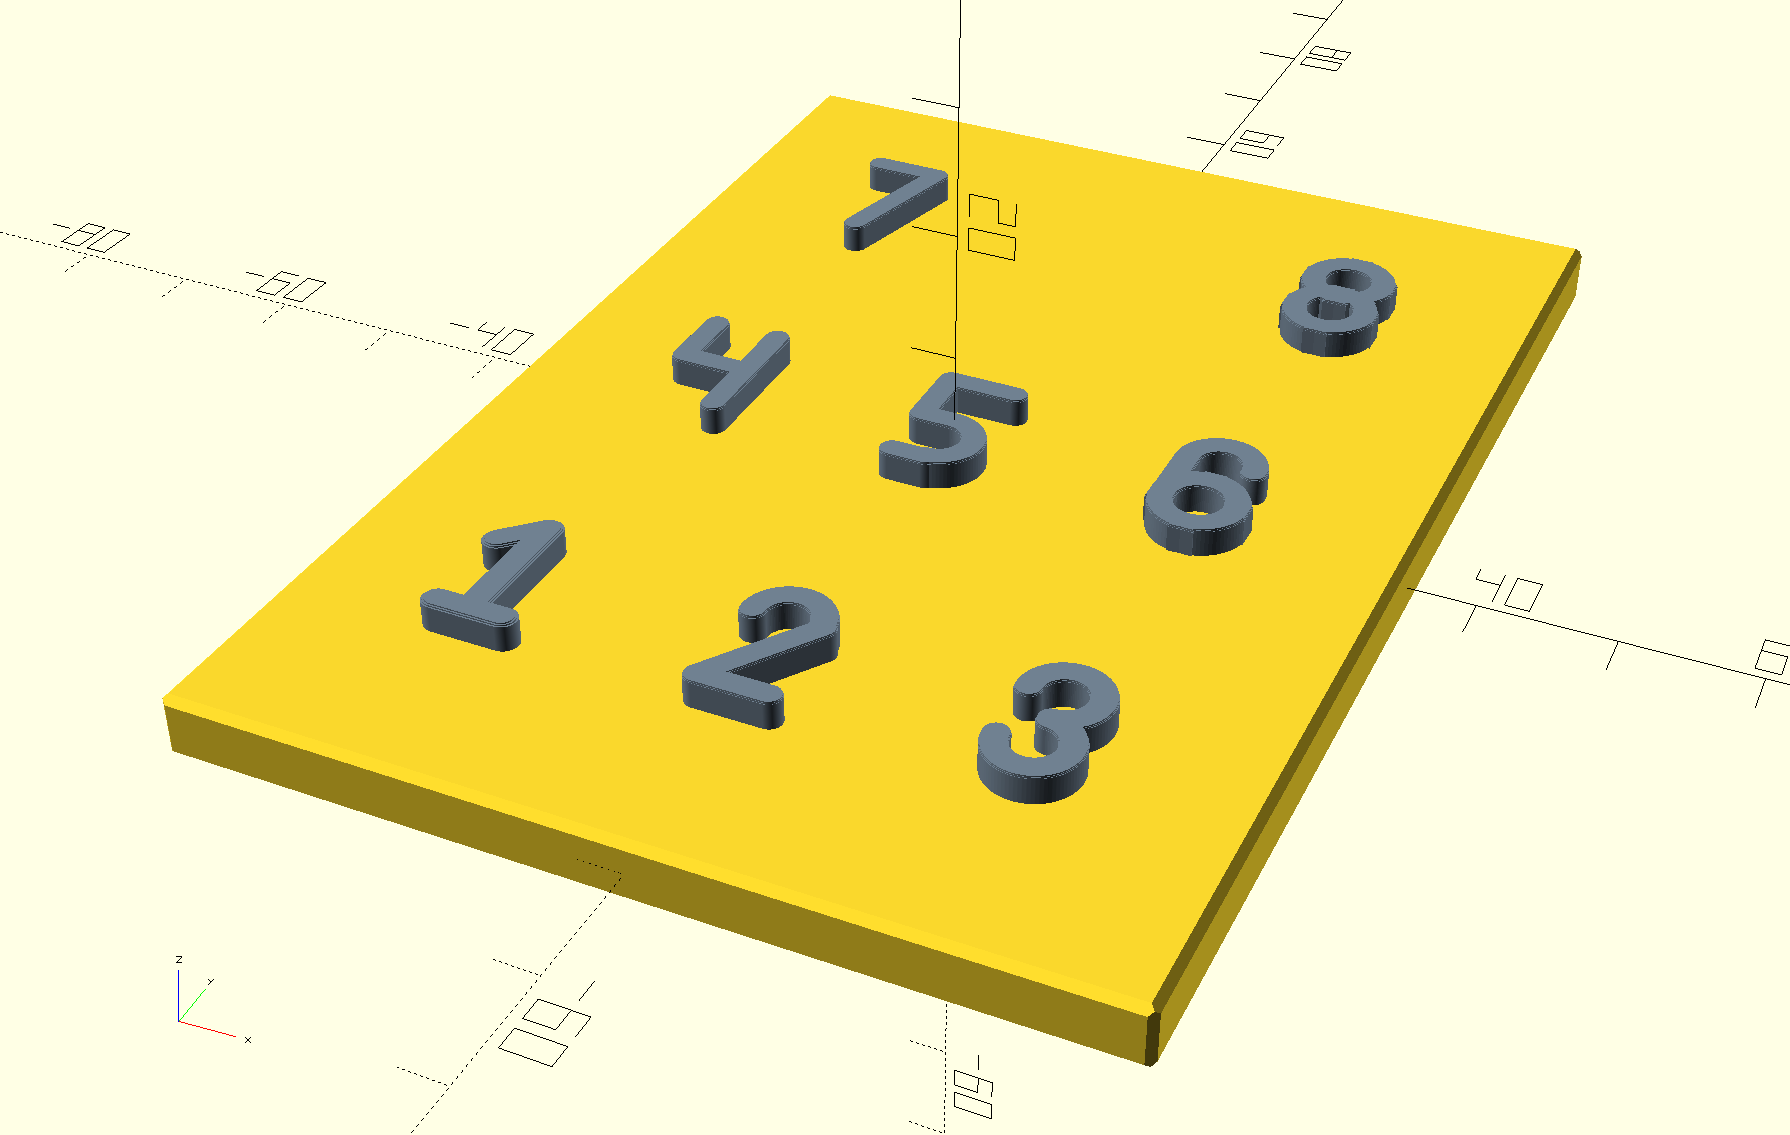
To make illustration easier, we’re going to choose eight very specific words – the digits 1 through eight. We’re going to create a 3 x 3 grid and put the digit “8” in the 9th grid location. Here’s what the base looks like after those values have been entered:

There are lots of problems with this layout but first, some obvious things to point out. The program really cares about the values you set for width and height of the board – to the point that things will overlap because there’s not enough space. That may result in an unusable board. Ensure that the height and width of the board is appropriate for the layout of its contents. For example, this board is sized to be used in landscape mode (width larger than height) but the contents of the board are calling for portrait mode (higher than wide).
You’ll also notice that the grid elements are numbered starting in the lower left corner. If you want “1” to go in the upper left corner, just set “Tile-Piece 7” to “one”. Finally, if you don’t assign a value (word or shape) to a grid location, that grid location will be blank.
Let’s start by making this a portrait mode layout by reversing the base height and base width values:
That looks better already. This is a “challenge tile” style layout for the board. To use it, you’ll need to render and print the base as well as each of the eight tiles.
Now we’ll look at what it means to include or not include targets and tile slots. First we’ll set “include tile slots” to “no” and leave “include target graphics” at “yes”:
This is what an “explorer” board looks like. It has no tiles or tile slots. You just render and print the “base” part.
Now let’s look at what the board looks like if the tile slots are included but the targets are not:

You would use this kind of board if you had already taught the student each of the shapes and now you just wanted to evaluate if they could organize them into a particular order or layout.
Let’s go back to the original form – both, target graphics and tile slots included:
Let’s look at what a tile looks like for this board. Let’s go with tile number “9” (the slot that has an “8” in it right now), because that’s the largest symbol. Choose “tile” as the part to print and set “tile number” to “9”:

The shape is too big for the tile. It’s dripping over the edge of the tile. Actually, the tile is too small for the shape – and the Blissymbol for the digits are smaller than most Blissymbols – so let’s look at how to make the tiles larger. There are three ways:
- shrink the symbol – but we’ve already said that these are small symbols
- decrease the minimum rail width between the slots – but if you look at the screenshot above you’ll see that it’s already set at its smallest value “2 mm”
- change the board layout by changing the number of rows and columns – that would probably result in different size problems
- increase the size of the board
Only the fourth option is reasonable in this case, though you still need to be sure that you don’t define a board that is too large to be printed.
Let’s, incrementally, increase the height of the board (since this is a portrait layout) until the graphic fits nicely on the tile… Increasing the height of the base from 100 mm to 120 mm results in a tile that looks like this:

That’s much better.
Change “part to print” back to “base” and we can see how that looks now:

That looks more evenly laid out.
Blissymbols derive some of their meaning based on their size relative to the distance between the earth and skylines as well as their orientation, vertically, relative to both. So, in order to properly represent a Blissymbol, you need to include indications of the earth and sky lines. If you include earth and sky lines on your tiles, they will also be placed on the base and included with the target graphics.
Here is a challenge tiles board with the Blissymbol for baby on the left and mother on the right:

The “baby” symbol has been moved downward so that it rests on the earth line – as it should. Here are what the associated tiles look like:
 |
 |
On occasion you may want to move the earth and sky lines down to leave room at the top to ensure that an action, evaluation, or plural indicator can be displayed on the tile. You can do that with the “move lines vertically” option. You will have to move each shape the same distance. Set the new value for each tile in the “–Tile-Piece” sections.
Tile-Piece Options
Now let’s look at the options in the “Tile-Piece Options” section:

The tiles are the small rectangles that go in the tile slots in the base. Their height and width are determined by the decisions you make about the base but you can control their thickness independently. These options also control the look and feel of puzzle pieces.
The “slot gap” option lets you control how much of a gap there is between the edge of a tile or puzzle piece and the edge of the accompanying slot in the base. Since the value you choose is in tenths of a millimeter, a value of 10 represents a 1 mm gap around the tile. The larger the value, the easier it will be to get the tile in and out of the slot. If it’s too large, it will be difficult to keep the tile or puzzle piece from falling out of the slot. You can determine the exact sizes of (in millimeters) the tiles and the tile slots by looking in the text of the Console pane. You’ll find four lines that present this information. They will update with each change you make:

By default the graphic will rise 2 mm above the top surface of the tile or puzzle piece, you can change the value to as much as 5 mm. Note that the value you set here will affect the height of the target graphics as well so that the target graphics feel exactly like the tile graphics.
Recommended/Starting Tile Base Dimensions
The template presets are all designed to support a tile that is approximately 30 mm square. The advantage of this approach is that it’s likely that a tile you print for one challenge tile set will fit in the slots in a different base – thereby, reducing the total number of tiles that you have to print. You may not be able to fit a symbol on a 30 mm square tile, forcing you to enlarge the slot, and then those tiles will be usable only with that challenge tile base – but for the most part you should be able to reuse tiles by starting with the template presets.
The templates adhere to the following standard measurements. You may be able to use them when converting one of your designs from one form to another.
| # rows | 1 | 2 | 3 | 4 | 5 |
| base height (with targets) | 65 | 138 | 205 | – | – |
| base height (no targets) | 34 | 71 | 104 | 138 | 172 |
| # columns | 2 | 3 | 4 | 5 |
| base width (mm) | 71 | 104 | 138 | 171 |
Here’s how these measurements can be used… If I had already created a 2 row by 3 column explorer using the built-in “2 rows x 3 cols – explorer” preset, the base would be 71 mm high and 104 mm wide. Now if I wanted to create a challenge tile set for the same shapes, I would simply make a copy of my explorer preset and give the new one a name to indicate that it’s a challenge tile set. Then I would change the “base height” to 138 mm (it’s still 2 rows of symbols, we’re just adding slots) and set the value of “include tile slots” to “yes”. Save these settings for the new preset and I’d be done – except for the rendering and printing of all the pieces…
Creating Bliss Puzzles
A Bliss Puzzle is very similar in concept to a challenge tile board except that you have more freedom regarding where you place words and shapes, and you can resize the symbols to better match the scene you’d like to create.

Unlike challenge tile sets, Bliss puzzles aren’t restricted to a grid layout. You can place Bliss words and shapes anywhere on the face of the puzzle. As a result, you have the option of creating a rectangular or circular puzzle base.
If you choose “no” for “include puzzle piece slots” you can create an “explorer” version of your puzzle. Explorers work well to introduce an individual to the concepts on the puzzle before adding the complexity of removable pieces. Leave the option set to “no” while you layout your scene. If you change the value to “yes” you will only see the slots that the pieces go in and you won’t see the associated Bliss word or shape.
One at a time, tell the designer what word or shape you’d like to place on the puzzle. In this example, our first element will be the “mother” core word:

Producing a puzzle base that looks like this:

The “mother” Blissymbol is placed in the center of the puzzle base. The symbol is scaled at 100% meaning that it is the same size as it would appear on a tactile symbol. However, we’re going to scale it 50% larger and move it 20 mm to the left:

And here’s the result:

Now we’ll add the core word “father”, increase the scale to 150%, and shift it right by 20 mm:

Finally, we’ve created a STL for the “baby” Blissymbol and placed it in the “beyond core words” folder. Then it was included in the puzzle as the third item and moved down 11 mm:

We’d like the figure of the baby to be physically separate from the mother/father figures so we’ll reduce its scaling to 75%:

If we’d like to create an explorer for the scene, we can stop here, but we’d like to create a puzzle. So the next step is to size the puzzle pieces. We’ll start with the mother piece and set Part > “part to print” to “puzzle piece”, and Part > “tile or puzzle piece number” to “1”:

To make this a workable puzzle piece, the yellow backing has to be just a bit larger than the figure. We do that by increasing the “puzzle piece height” and “puzzle piece width” to 35 mm:

Note, the height and width values are the same only by coincidence because the figure itself is as high as it is wide.
Now we’ll repeat the process for the other two figures.
If we now display the puzzle base again (by setting “part to print” to “puzzle base”) and set “include puzzle piece slots” to “yes”, we can see how the pieces will fit together (or not):

It appears that the “baby” puzzle piece overlaps the “mother” and “father” puzzle pieces.
The designer accounts for this by trimming the “mother” and “father” pieces:
 |
 |
We didn’t notice this cut at first because we hadn’t yet added the “baby” piece to the puzzle.
The program decides which pieces to trim and which ones to leave whole based on whether there is an overlap and, if there is, which piece has a lower number. The lower piece will be trimmed by a higher numbered piece. In our example, the “baby” piece overlaps both the “mother” and “father” pieces and is higher in number than both of them.
If you think that overlapping pieces make the puzzle too complex then you can eliminate the overlap by moving pieces further apart – that may require that you make the puzzle base larger.
Decorations
You can add some special features to your puzzle base called “decorations”. The designer supports up to 5 decorations:

The puzzle designer supports two types of decorations: a circle or a line, and you can put up to 5 of these circles and/or lines on your puzzle base.
You should limit your inclusion of decorations because you don’t want to distract from the Blissymbols themselves. They should provide important context or be left off of the puzzle.
Three of the four the out-of-the-box puzzles includes one or two decorations:
 |
 |
 |
| 1 circle decoration to indicate the edges of the head | 2 line decorations to represent the rock on which the bear is standing | 1 line decoration to demarcate between the organisms that live above and below ground |
In all cases, you should minimize the height of a decoration. In the above puzzles, the decorations are 0.2 mm high while the Bliss words are 2 mm high.
You use the b, c, d, e, and f options to control the size and location of the circles or lines.
| Option | Circle decoration | Line decoration |
| b | circle thickness | start x-coordinate |
| c | inner diameter | start y-coordinate |
| d | move vertically | end x-coordinate |
| e | move horizontally | end y-coordinate |
| f | line thickness |
The best way to determine these values is to simply set them for a puzzle and see what happens, then change them as necessary.
Note that the decorations are part of the puzzle base. If your puzzle pieces overlap one of these decorations, the decoration will disappear there.
Embedding RFID Tags
Finally, you can indicate whether you want to insert an RFID tag into your tiles or puzzle pieces during printing. The RFID tag is intended for use with the Voice It device described here. If you select “yes” a pocket will be included in each tile, just large enough for a 30 mm RFID tag. Selecting “yes” won’t stop you from printing the tiles or make them look strange. So if you accidently choose “yes” but didn’t intend to insert a tag, don’t worry, just go ahead and print your tiles – they will look fine. Your tiles must be at least 34 mm wide to properly insert a tag. Watch the console window and change the design of the base until you see that the tile size is at least 34.
What if…
What if you want to create a single large tile with a single Blissymbol and earth/sky lines? How would you do it?
Recognize that the the board base looks a lot like a tile – except that it doesn’t have to be square in shape.
- Create a base with one row and one column.
- Set “include target graphics” to “yes”.
- Set “include tile slots” to “no”.
- Put the concept or shape of your choice in position 1.
- Turn on earth lines and sky lines.
- Move the concept or shape vertically until it sits where it should relative to the earth/sky lines.
- Resize the graphic using the “scale graphic” option until it’s the right size for your need. The distance between the earth and sky lines will update automatically.
- If necessary, move the earth/sky lines vertically (and move the symbol the same amount) to position everything in the center of the base.
- Resize the base if necessary…
And here’s what you have:

How do I…
We’ve tried to give you a complete set of shapes to use in your explorers, challenge tiles, and puzzles but you’ll, no doubt, have even more ideas. You may also have incorporated a new concept into your “beyond core word” set and want to add it to a board. Here’s how to do it…
Inclusion-Ready STL
The first step will be to create an inclusion-ready STL file. The instructions on this page describe how to accomplish that task. You then need to add it to the “beyond core words” folder to make it visible to the Bliss Tiles designer. A new “basic shape” (i.e., part of a Bliss Symbol) would be added to the “basic shapes” folder.
To add a new shape, the process is very similar but you will start with the “basic shapes.pptx” PowerPoint file in the “documents” folder. This file contains all the basic shapes you’re likely to need and they’ve already been “fattened” up for your use. You may need to ungroup an existing symbol, copy the part of the symbol that you want to use as a new shape, and save just that part as an SVG file. You’ll still use the “Bliss Bliss Graphic STL maker.scad” program to create the inclusion-ready STL file. You should save the shape STL in the “basic shapes” folder.
Putting it all together
The following video will take you through the steps described above to create an explorer and a challenge tile set:
The next video will take you through the process of creating a Bliss puzzle:
Note for Printing Puzzles, Explorers and Challenge Tiles
These items (especially when they’re rectangular in shape) pose a unique problem for 3D printers. They’re simple shapes but they have large surface areas where they make contact with the build surface of the printer. Let’s just say simply that they can tend to warp at the corners as the printing process proceeds. This can result in a final print that doesn’t sit flat on a surface and can have a rough top surface above the warped region.
It’s critical that there be excellent adhesion between the build surface and the first layer of the print. You may be able to solve this problem by adding a brim to the print in your slicer but the print can have a sharp bottom edge even after you remove as much of the skirt as you can. I think a better approach is to add glue stick to the print surface before starting the print. There are “fancy” glue stick preparations but just about any version that you’d find in an elementary school will work.