The Arduino integrated development environment is free software used to program every Arduino (or Arduino knock-off) board. You’ll use it to install software on the Arduino MKR Zero board inside the Voice It and to validate the assembly of your Voice It at several steps during the assembly process.
(Click on any image below to expand it.)
Begin by downloading and installing the latest version of the Arduino IDE.
Select the version of the software that is appropriate for your computer.
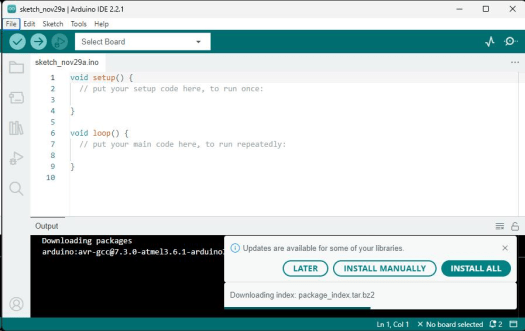
When you’re done installing, Launch the Arduino IDE:
You may be asked to update some libraries. If you do, click on “INSTALL ALL”. You may see requests like this one along the way:
Click on “Install”. Repeat until you’re no longer asked to update libraries.
Installing the MKR Zero Board Library
Launch the Arduino program. Go to “Tools > Board: > Boards Manager”. Type “Arduino SAMD” into the search box.
Click on the “Arduino SAMD Boards (32-bit ARM Cortex M0+)” entry and then click on the “Install” button that appears in the lower right corner of the entry.
Installing Libraries for the Voice It Program
Go to “Tools > Manage Libraries…”. Type “SdFAT” into the search box.
Click on the entry called “SdFat by Bill Greiman” and then click on the “Install” button that appears. You may need to give your computer permission to continue with the installation.
Repeat the same process to install the “MFRC522 by GithubCommunity” and the “AudioZero by Arduino” libraries.
That’s it. The Arduino software is ready.
Loading the Voice It Software
Now that the Arduino IDE is installed and configured, you should download the Voice It software. You can download the Voice It software and supporting files from here.
Remove the “.txt” at the end of the filename and then expand the “.zip” file. This will create the Voice It folder. The software is contained in the “Voice It program” folder.
 |
 |
After you’ve downloaded and unzipped the Voice It files:
Open the “Voice It program” folder and open the “voice_it” folder:
and double-click on the file called “voice_it.ino”. This will load the Voice It program into the Arduino IDE – in a new window (you can close the previous window).
From the menu, choose Tools > Board: > Arduino SAMD (32-bits ARM Cortex-M0+) Boards > Arduino MKRZERO.
You can verify that you have properly set up the Arduino IDE by clicking on the “Verify” button:
and observing that the process completes successfully by looking at the “Output” at the bottom of the window:
Connecting the Arduino IDE to the Arduino MKRZERO board
You need a “data” USB cable to attach your PC to the Arduino board. There are two kinds of USB cables. One is only used for charging a device and the other can be used to transfer data to and from the device. You will need the latter. It can be hard to tell what kind of cable you have. The best way to tell is just to use the cable to connect your PC to the Arduino and then check if the Arduino IDE can sense the board.
Plug your cable into a USB port on your PC and into the micro USB port on the Arduino MKRZERO board. Now go to Tools > Port > and select the port that (probably) includes a reference to the MKRZERO board:
If you don’t see the board listed, you may have grabbed a “charging” cable rather than a “data” cable. You can purchase a “data” cable online if you can’t find one in your home.
What you want to see is something like this in the status bar at the bottom of the Arduino IDE window:
You’ll also see the board and port listed in the Tools menu:
Obtaining the Board Information
The final test of the connection between your PC and the Arduino MKRZERO board is to obtain the
From the Tools menu choose “Get Board Info”:
If you’ve successfully connected your board to the Arduino IDE, you’ll see a box something like this:
What this box says is less important than the fact that you can retrieve the information at all. You will, of course, want to see “Arduino MKRZERO” in the first line.
If you can’t retrieve the Board Info, check that you have the correct board and port selected in the Tools menu and check that the USB data cable is securely connected on both ends. Finally, you may be using a “charging” cable rather than a “data” cable.
Uploading the Voice It software to the Arduino MKRZERO
When instructed to upload the software, simply click on the “Upload” button to the right of the “Verify” button:
If you try to upload the software and you get an error like this:
It just means that the IDE has forgotten which port your Arduino MKRZERO board is connected to so repeat the process described above of Connecting the Arduino IDE to the Arduino MKRZERO board.
Launching the Serial Monitor
When instructed to open the Serial Monitor, just click on the “magnifying glass” button to the far right of the Verify and Upload buttons:
A new tab will open up to the right of the “Output” tab, called “Serial Monitor”:
You can move back and forth between the Output and Serial Monitor tabs by clicking on their names. When asked to clear the content of the Serial Monitor window, simply click on the button at the far right of the tabs:


